Connecting Microsoft OneDrive with Oracle Integration Cloud (OIC)
Introduction to App Registration in Azure
In Microsoft Azure, App Registration is the process of creating an identity configuration for an application within the Azure Active Directory (Azure AD) environment. This registration allows the application to authenticate and gain authorized access to Azure resources and APIs, including Microsoft Graph, custom APIs, and other protected services.
By registering an application in Azure AD, administrators can:
- Generate credentials such as Client ID (Application ID) and Client Secret for secure authentication
- Define redirect URIs to control where authentication responses are sent
- Assign permissions (delegated or application) to access Microsoft and custom APIs
- Enable OAuth 2.0 and OpenID Connect authentication flows
App Registration is a crucial step for enabling secure integration between applications and Azure services. It forms the foundation for implementing Single Sign-On (SSO), securing APIs, and automating workflows with the Microsoft identity platform.
Prerequisites for Azure App Registration
You must be able to log in to the Azure Portal.
Application name (a friendly identifier) and, optionally, a redirect URI (mainly for delegated flows — not mandatory for OIC REST integration).
An understanding of Microsoft Graph endpoints, and the required permissions: Files.ReadWrite.All and Sites.ReadWrite.All.
An Oracle Integration Cloud (OIC) instance where the REST connection will be created.
1) Creating an App Registration in Azure
Follow these steps to register your application in Azure AD and generate the credentials OIC will use to authenticate against Microsoft Graph.
Sign in to the Azure Portal. Open https://portal.azure.com in your browser and sign in with an Azure AD account that has admin or appropriate permissions.
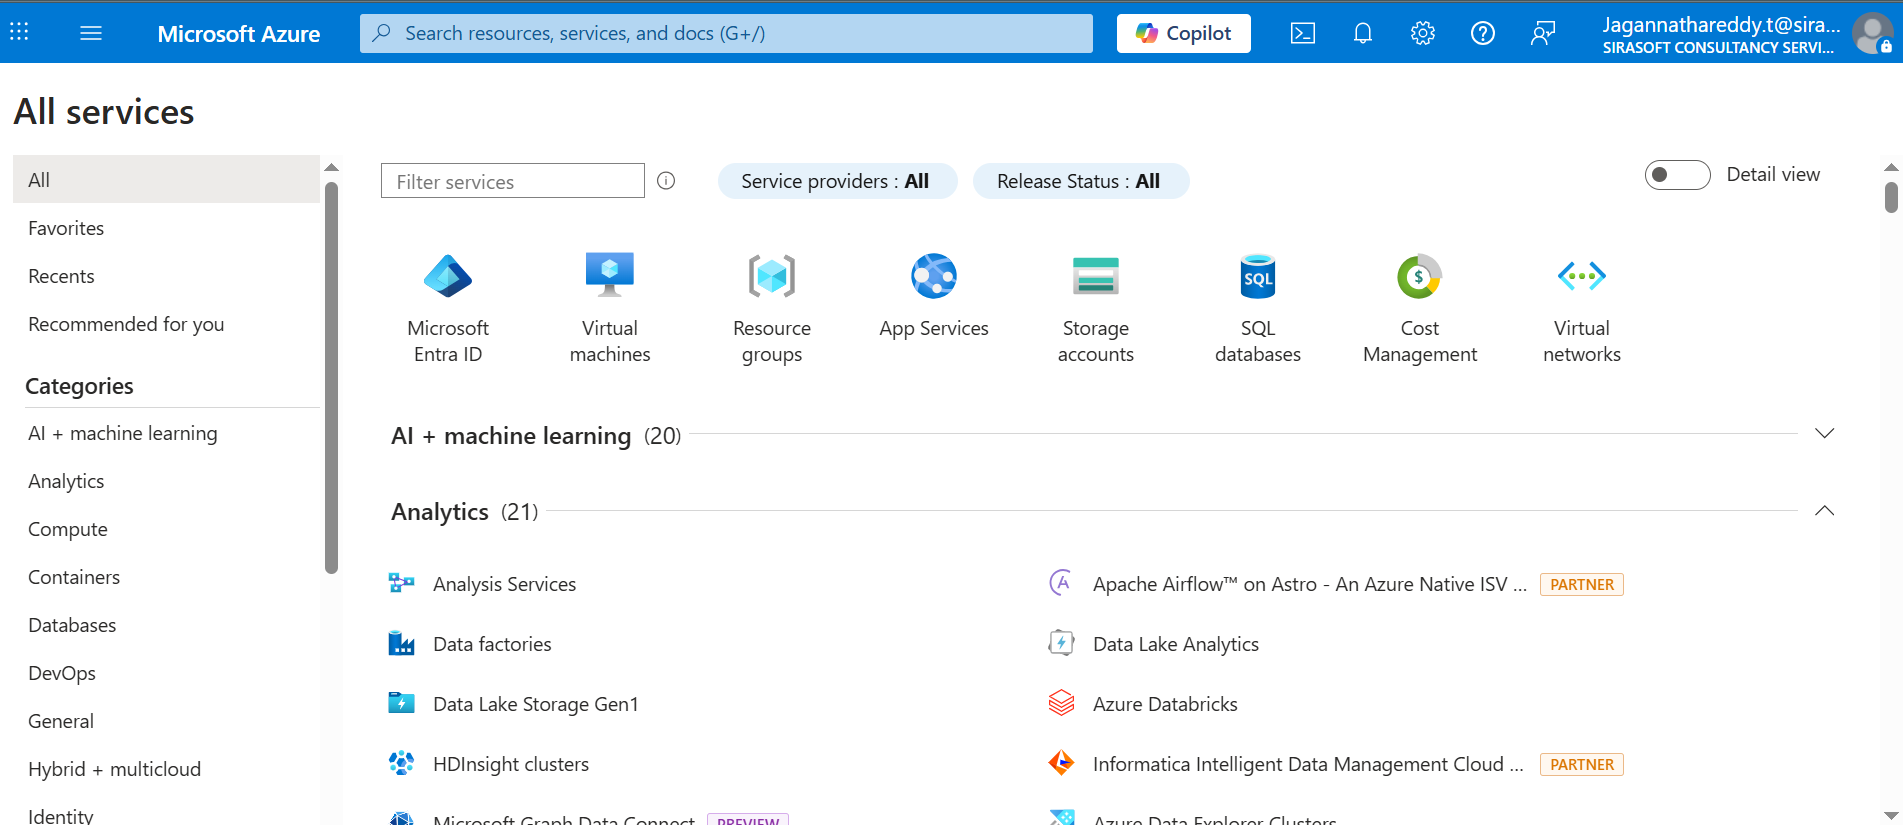
Search for App registrations in Azure AD.
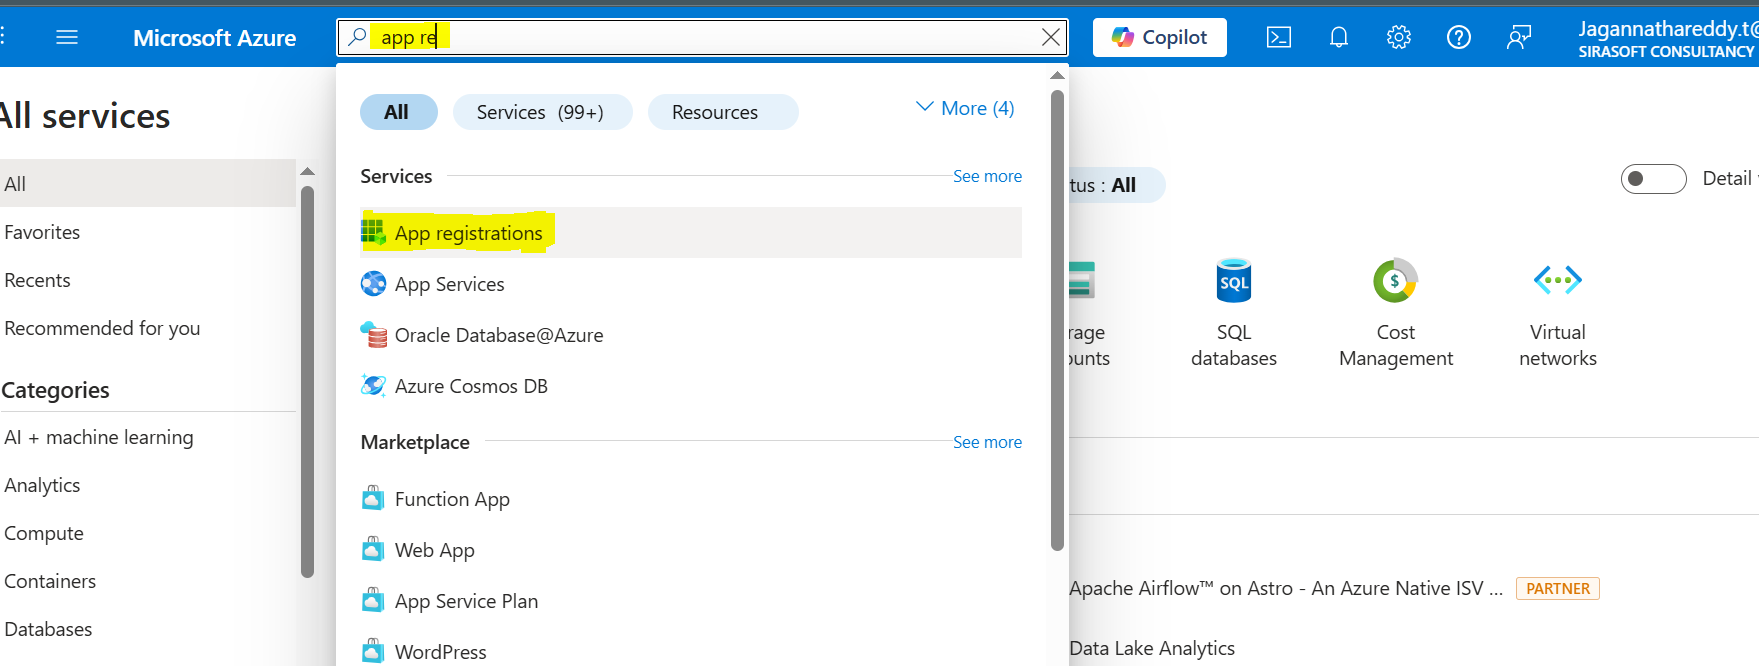
Click New registration to open the registration page.
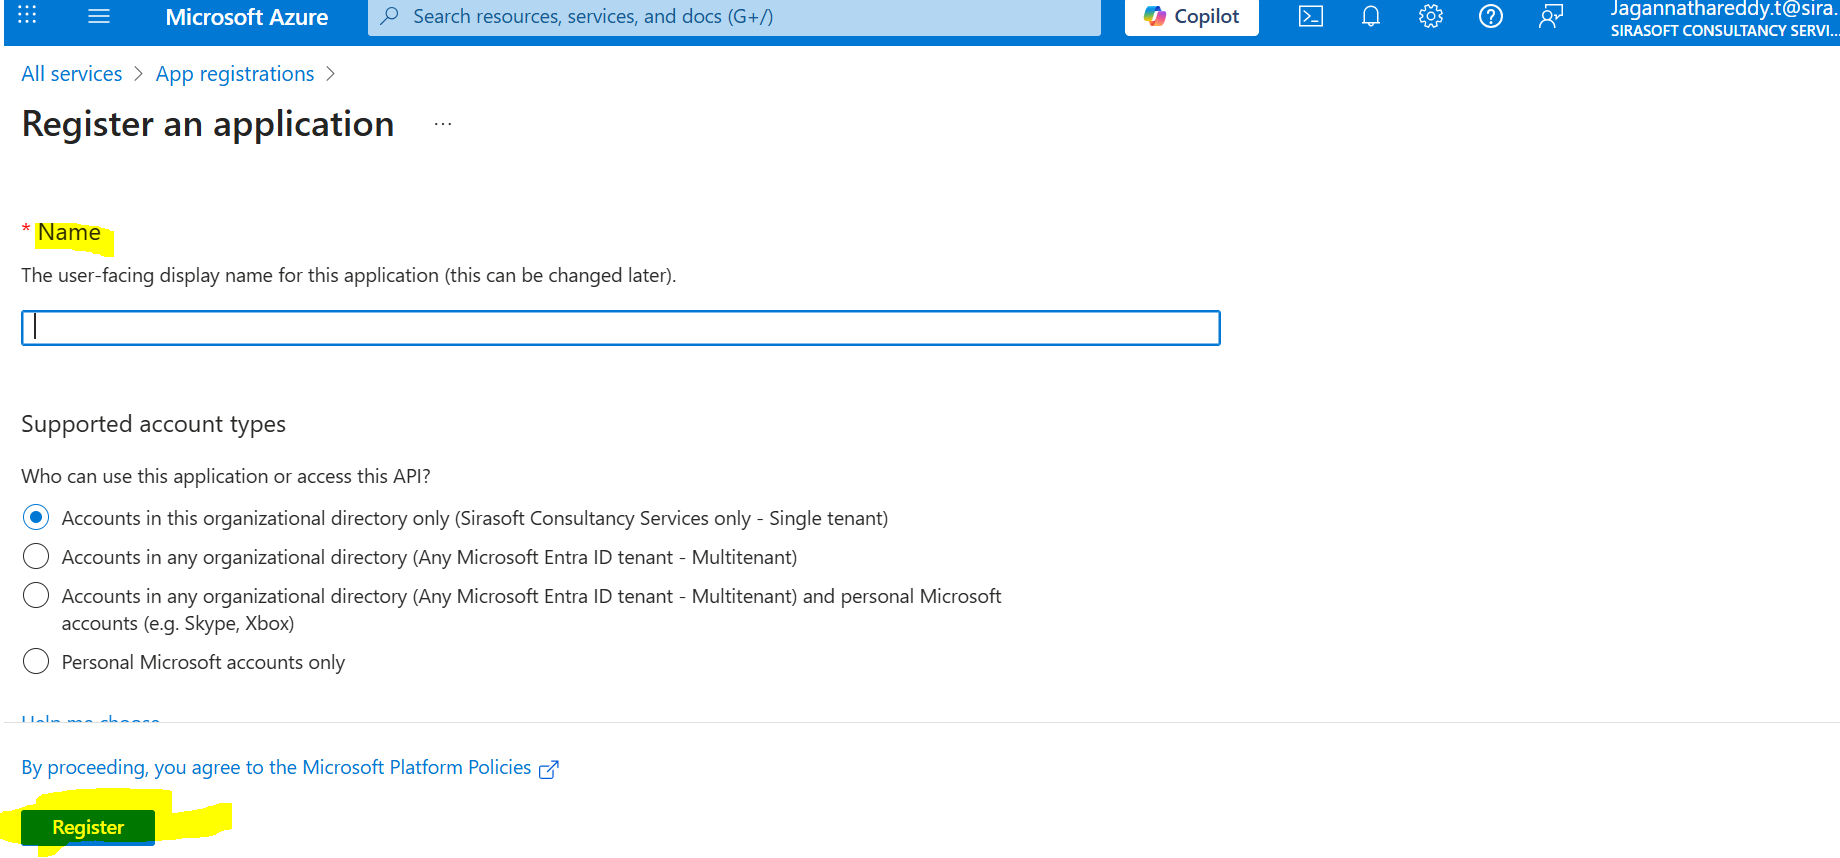
Enter a name for the application and click Register.
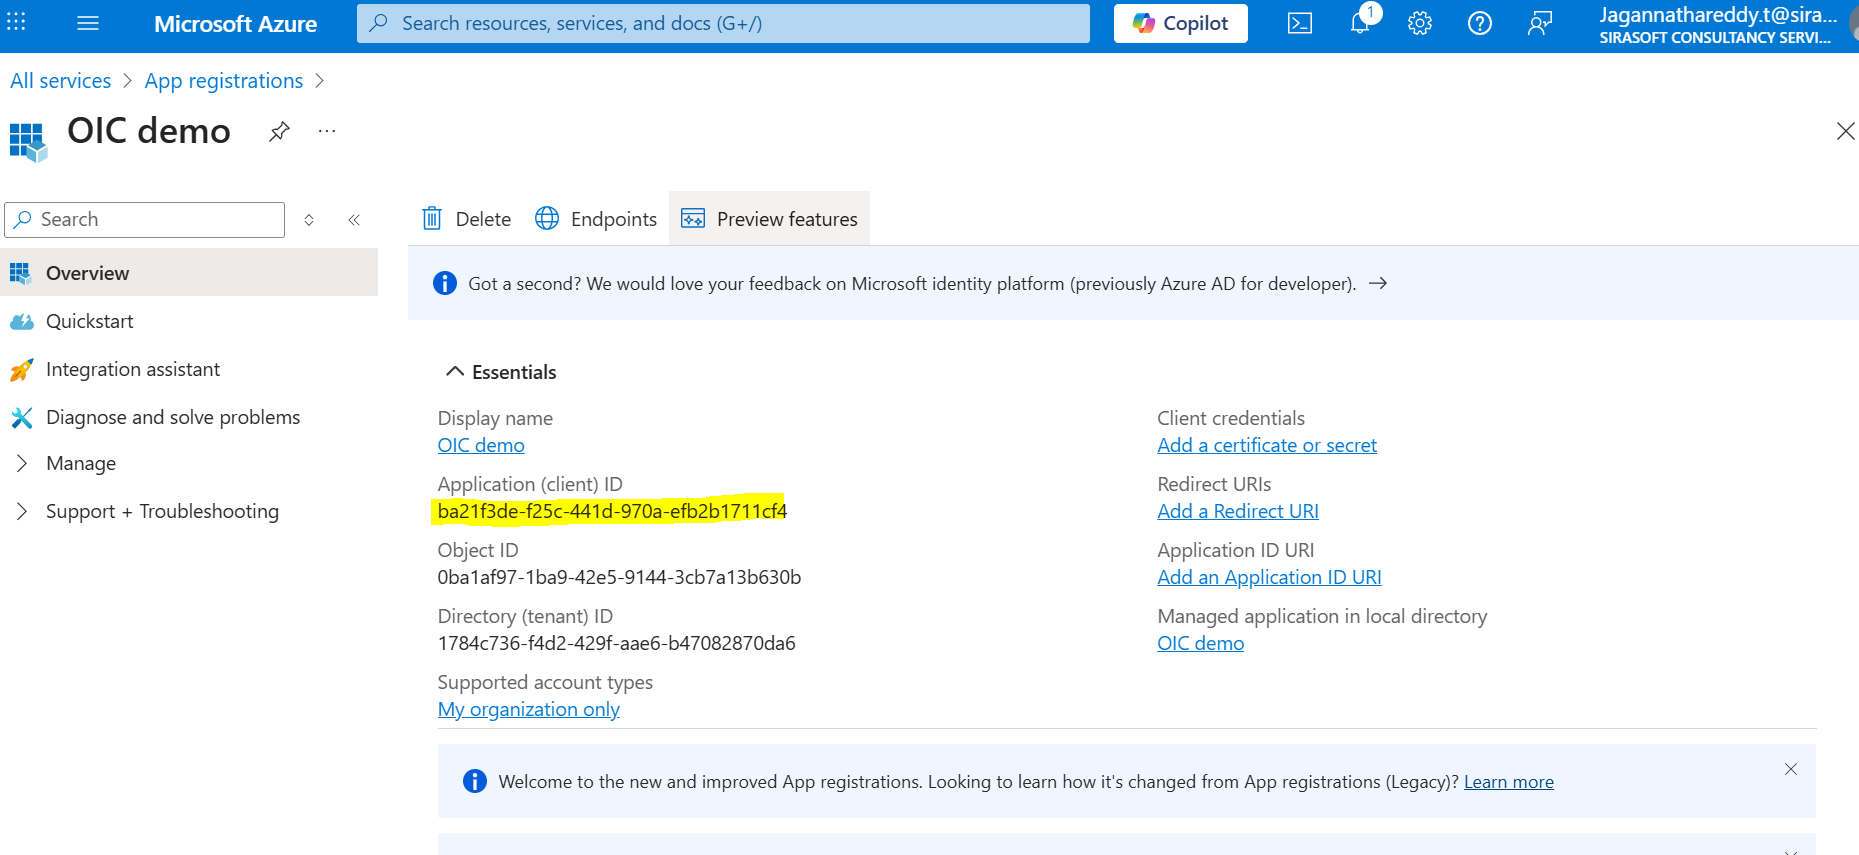
The application overview is created — you can see all the registration details on this page.
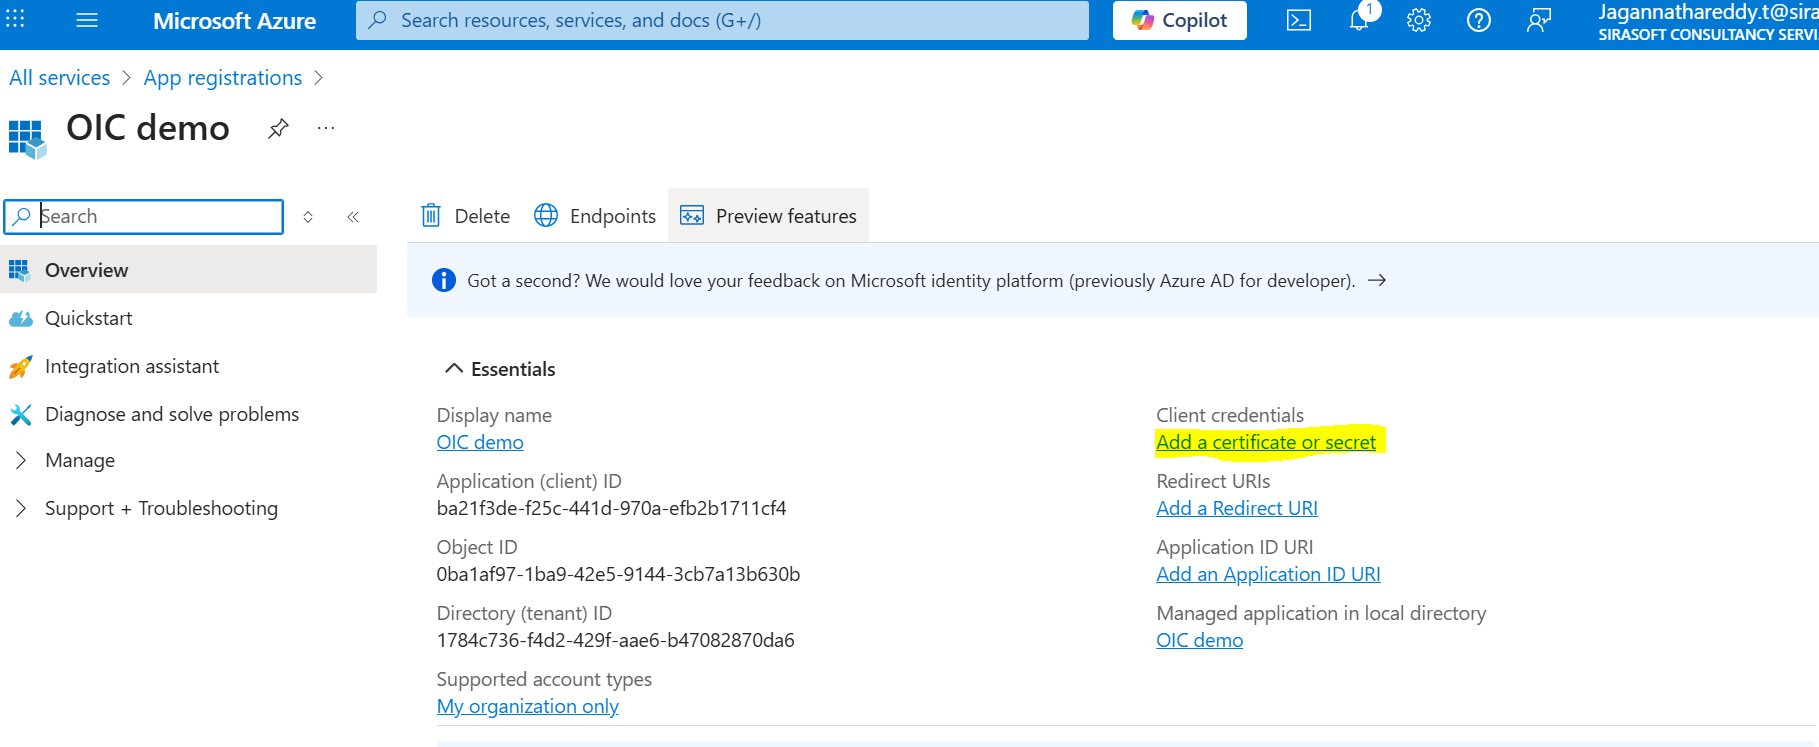
Open Certificates & secrets and click Add a certificate or secret.
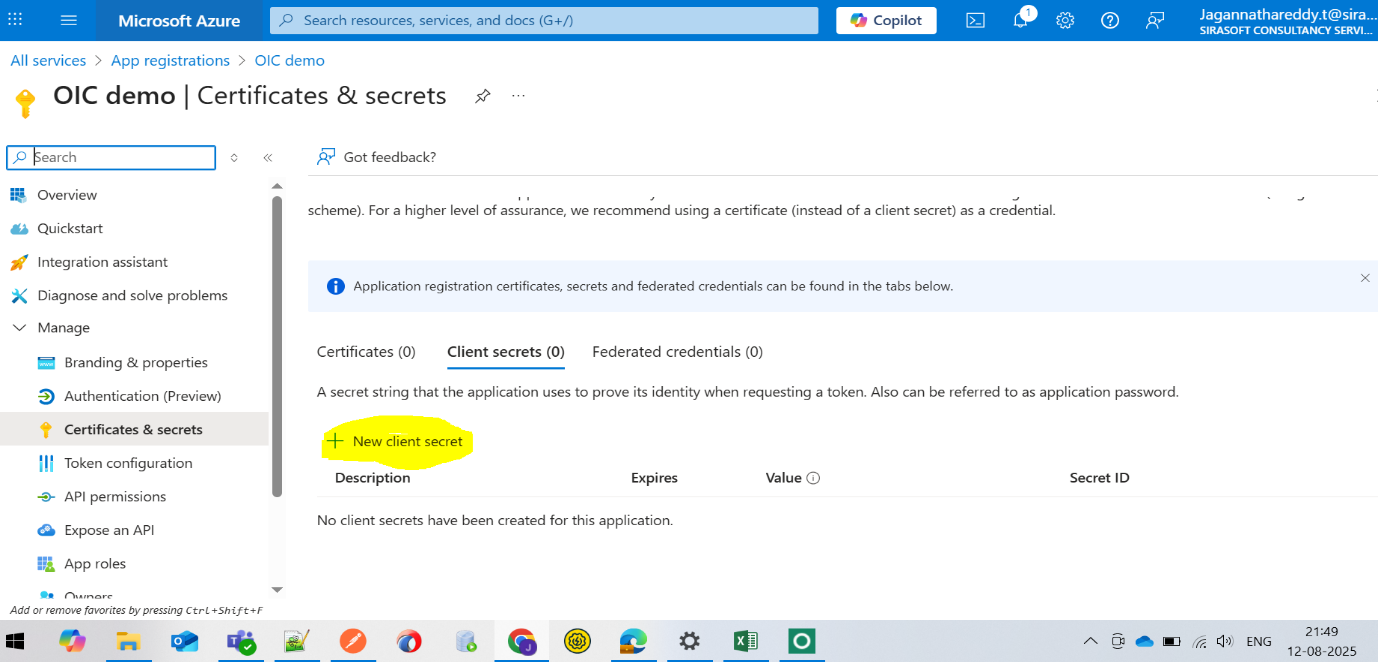
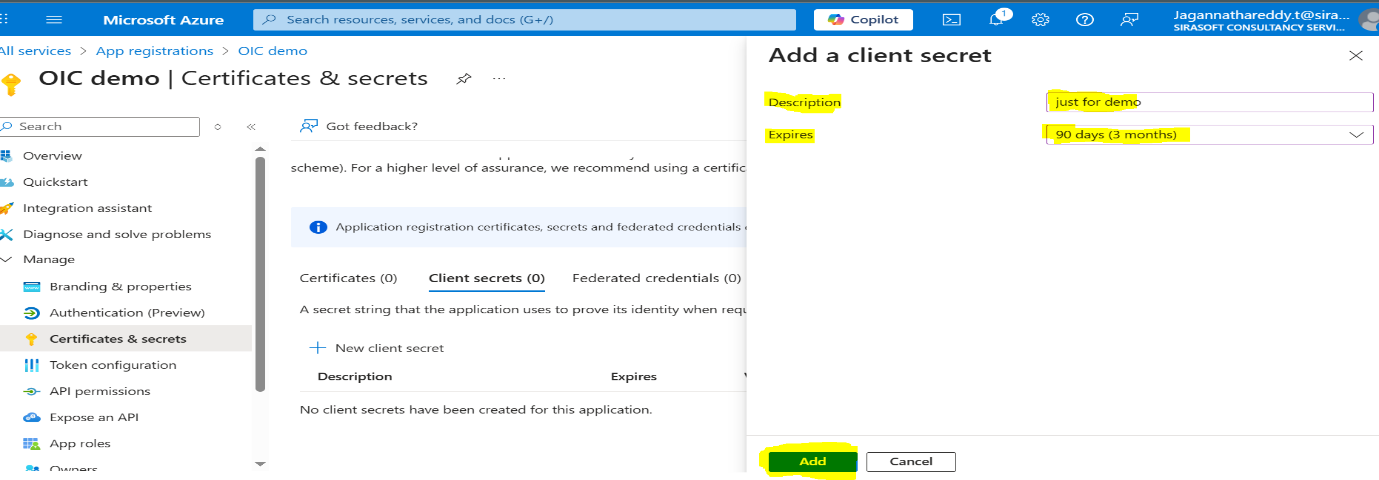
Click New client secret.
Provide a description and an expiry date, then click Add.
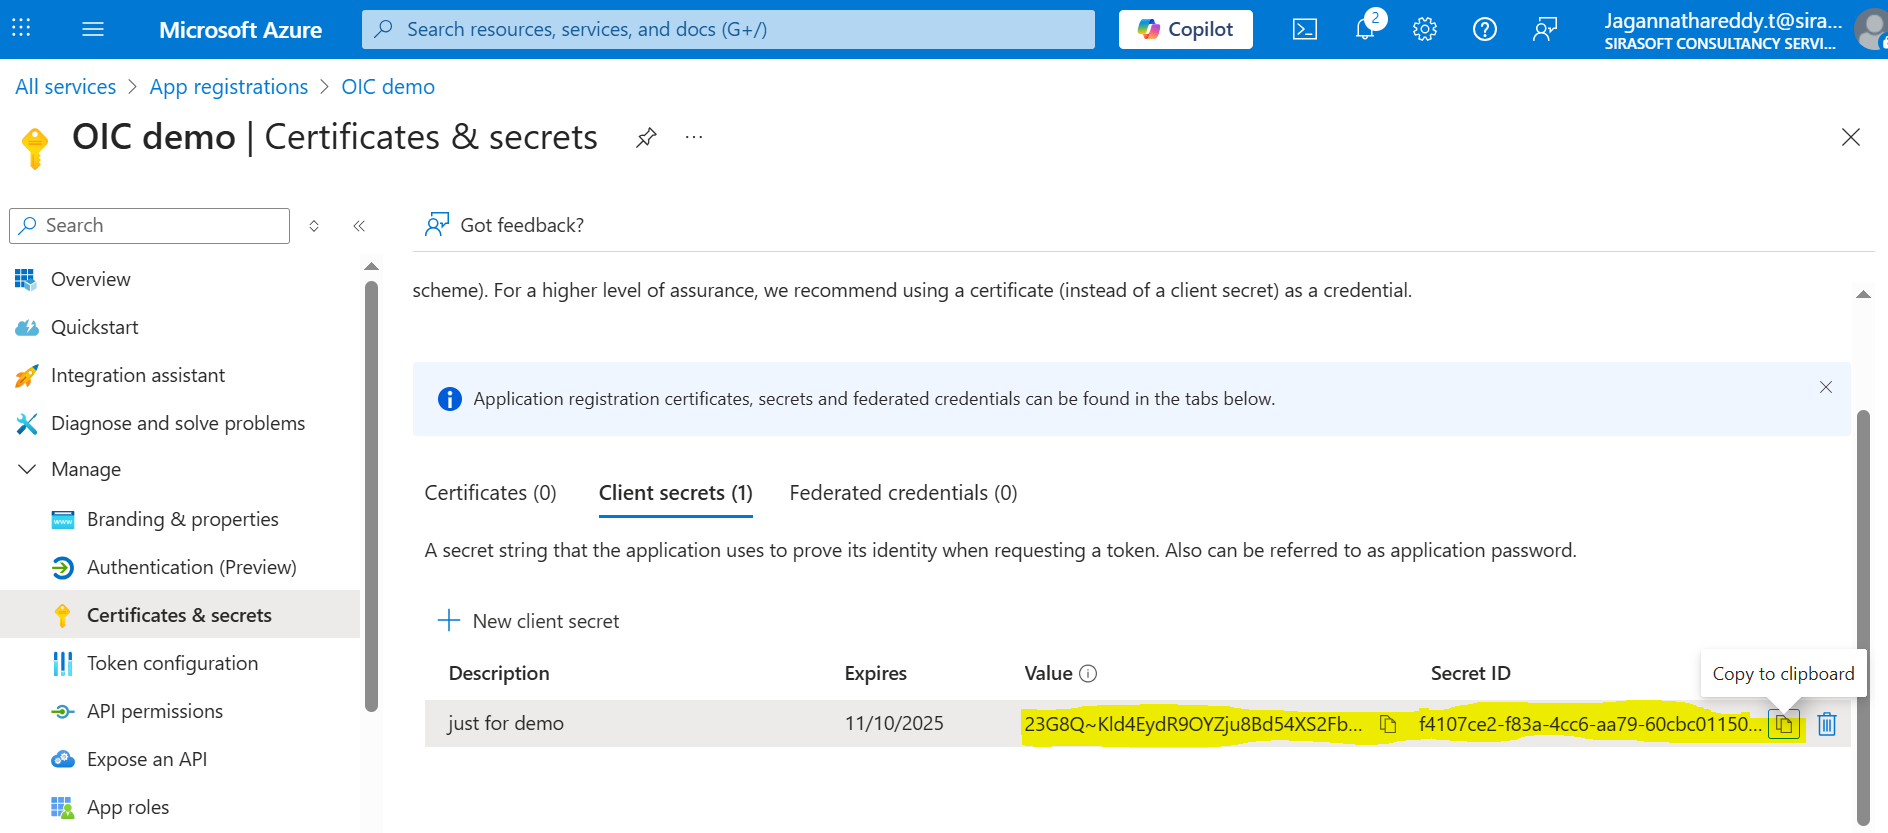
Once added, Azure generates a secret value and secret ID. Copy the secret value immediately — it is shown only once.
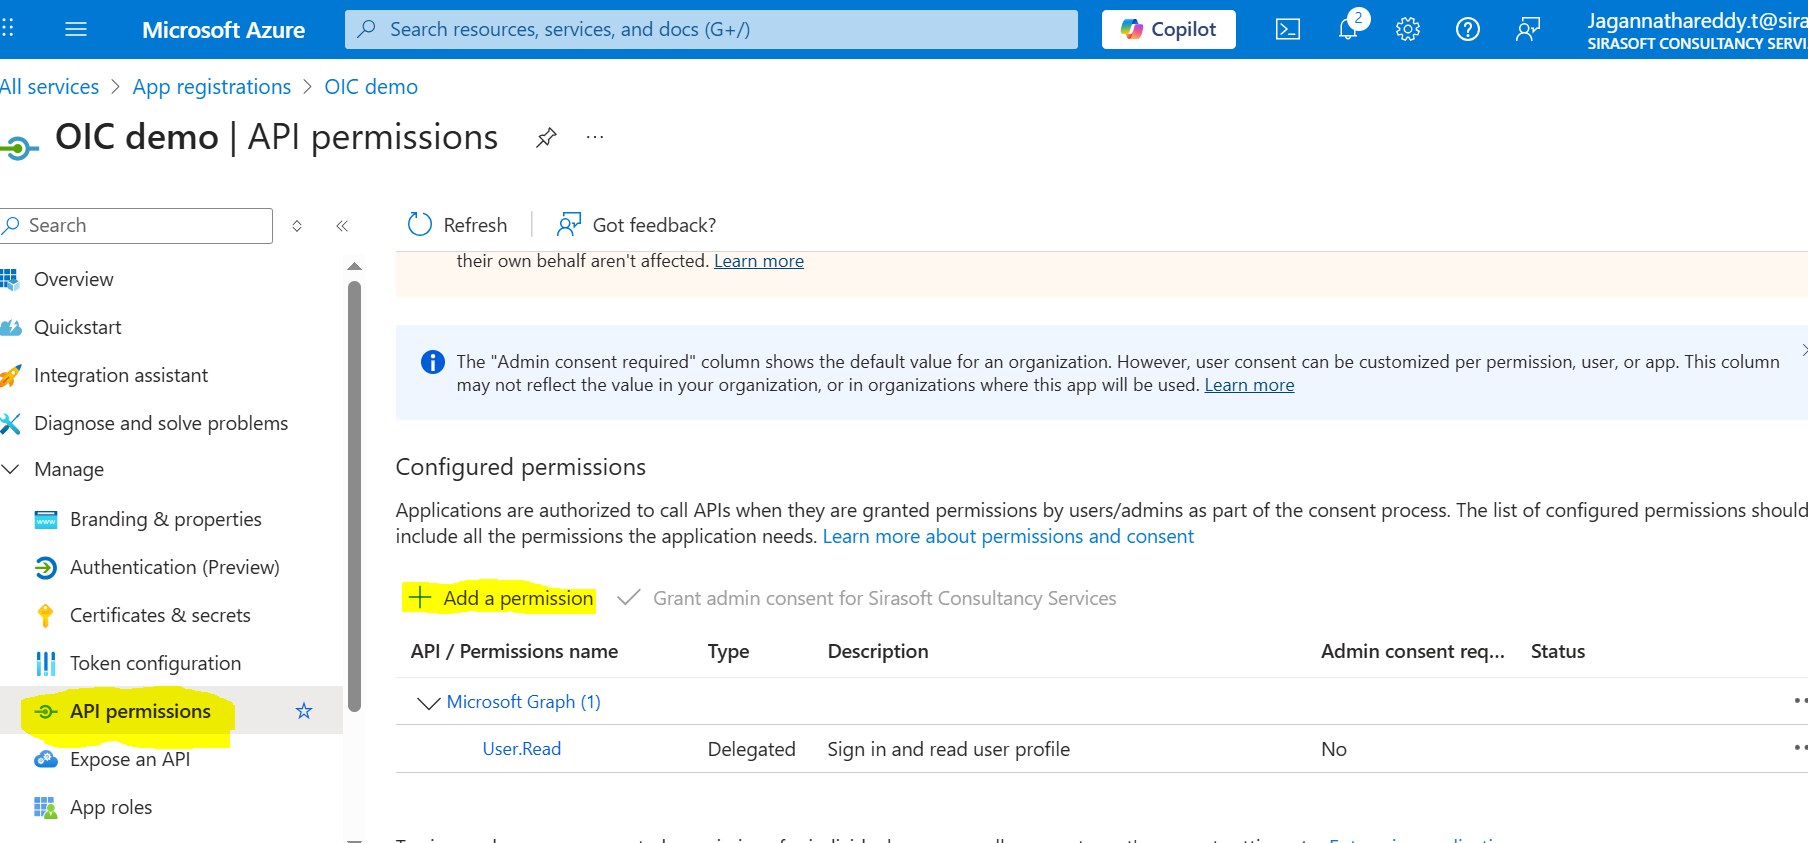
Now add the API permissions. Open API permissions and click Add a permission.
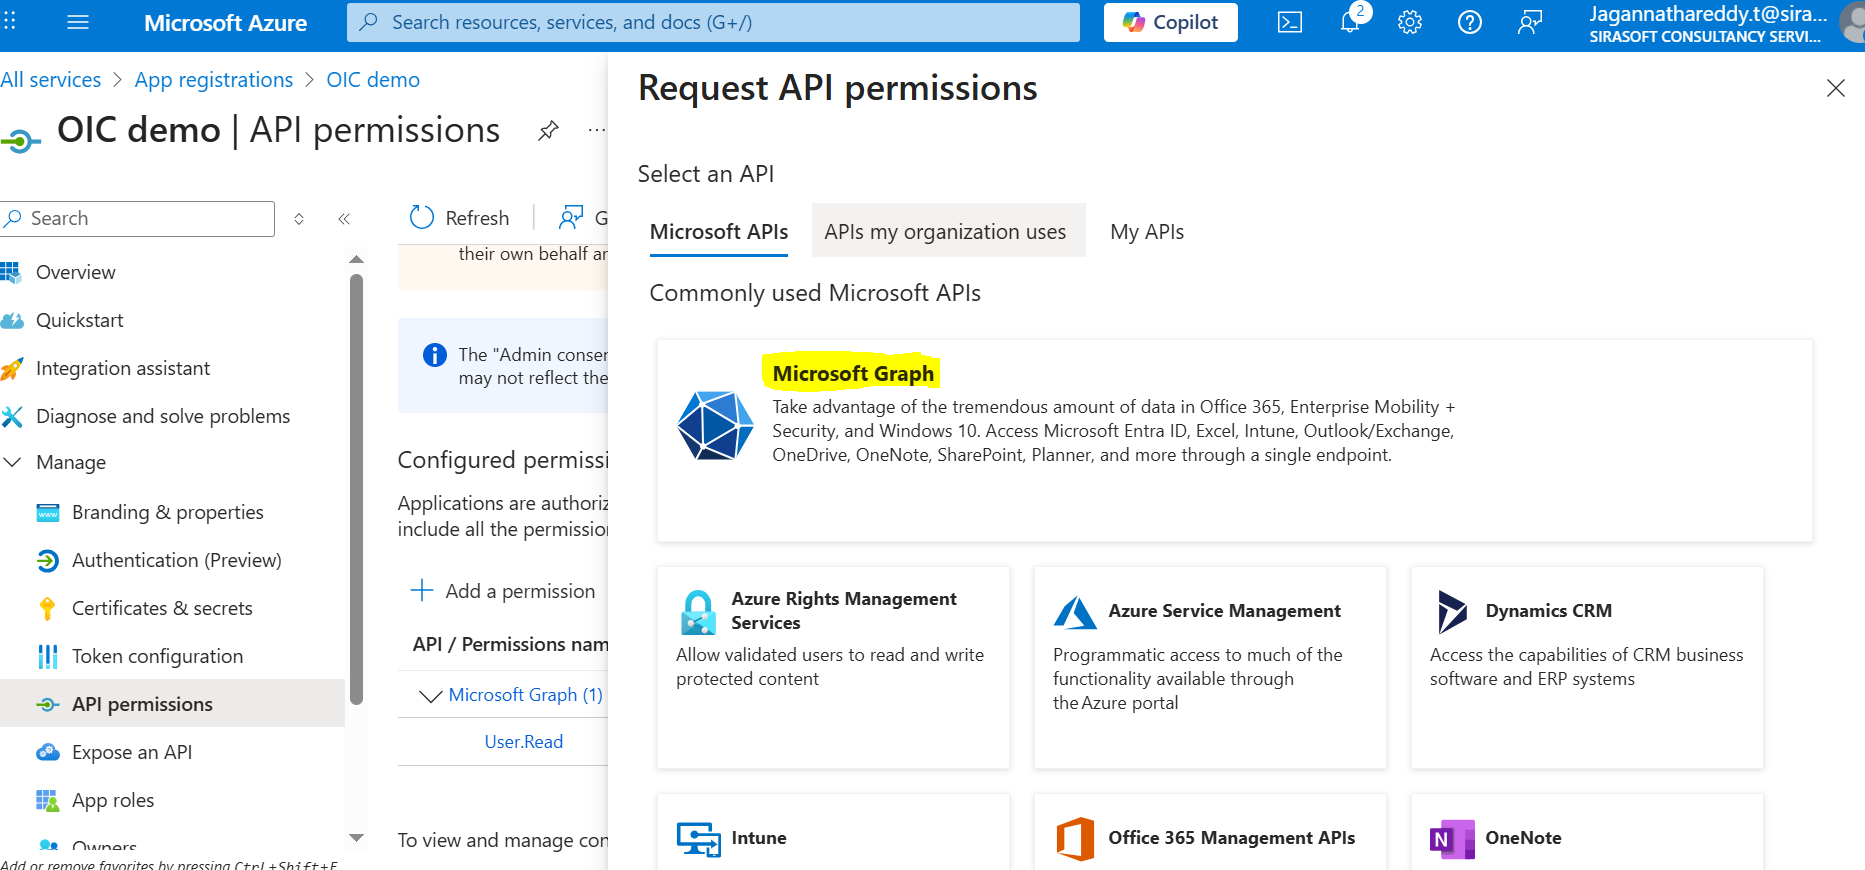
Select Microsoft Graph.
Choose Application permissions.
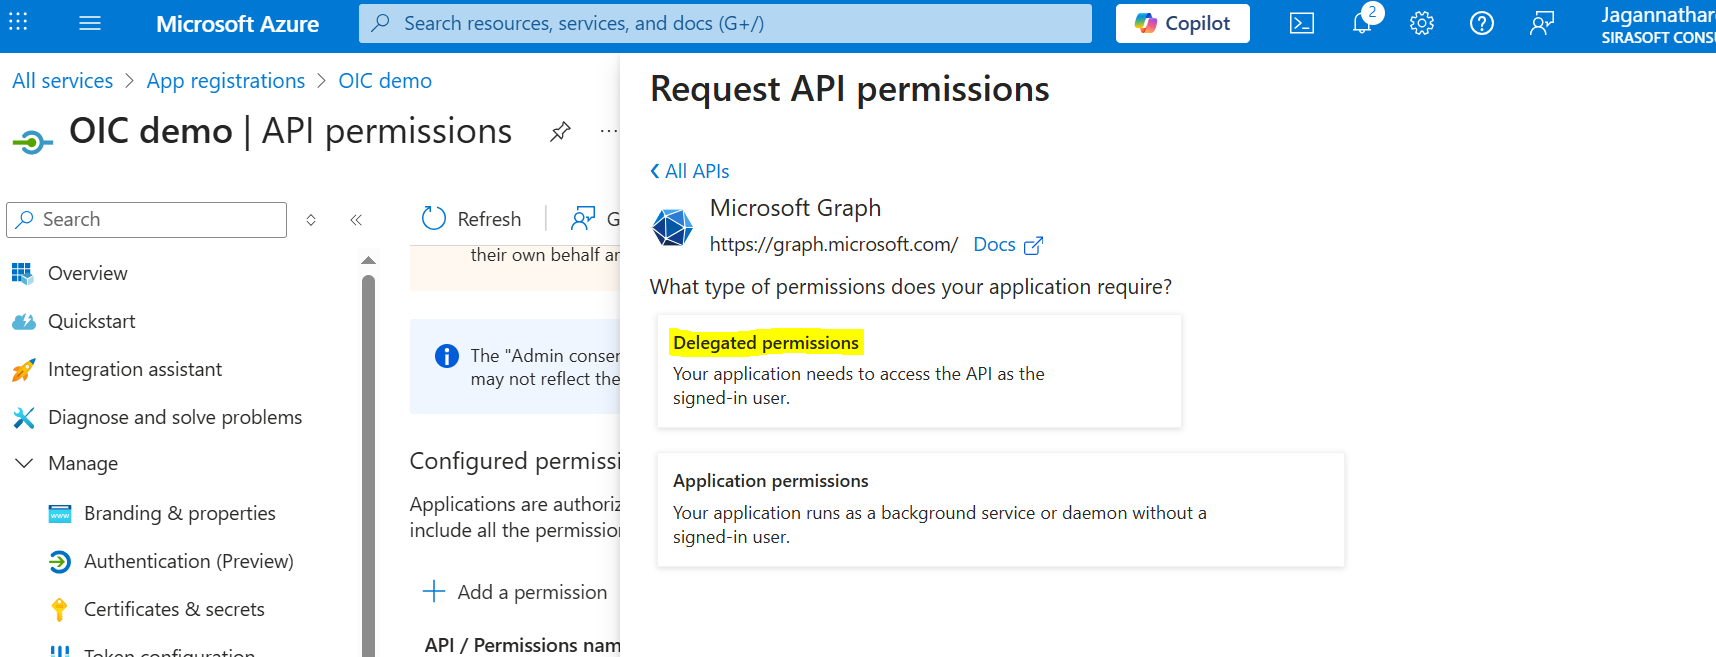
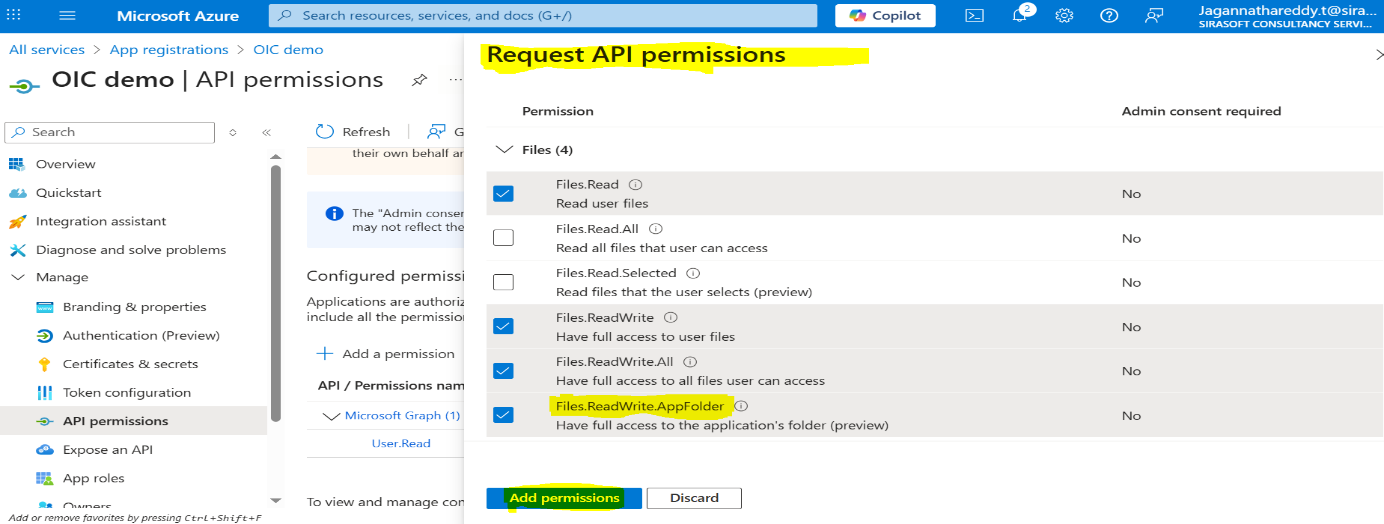
Add the permissions you need (for example Files.ReadWrite.All and Sites.ReadWrite.All). These application permissions must be granted admin consent before the API endpoints can be used.
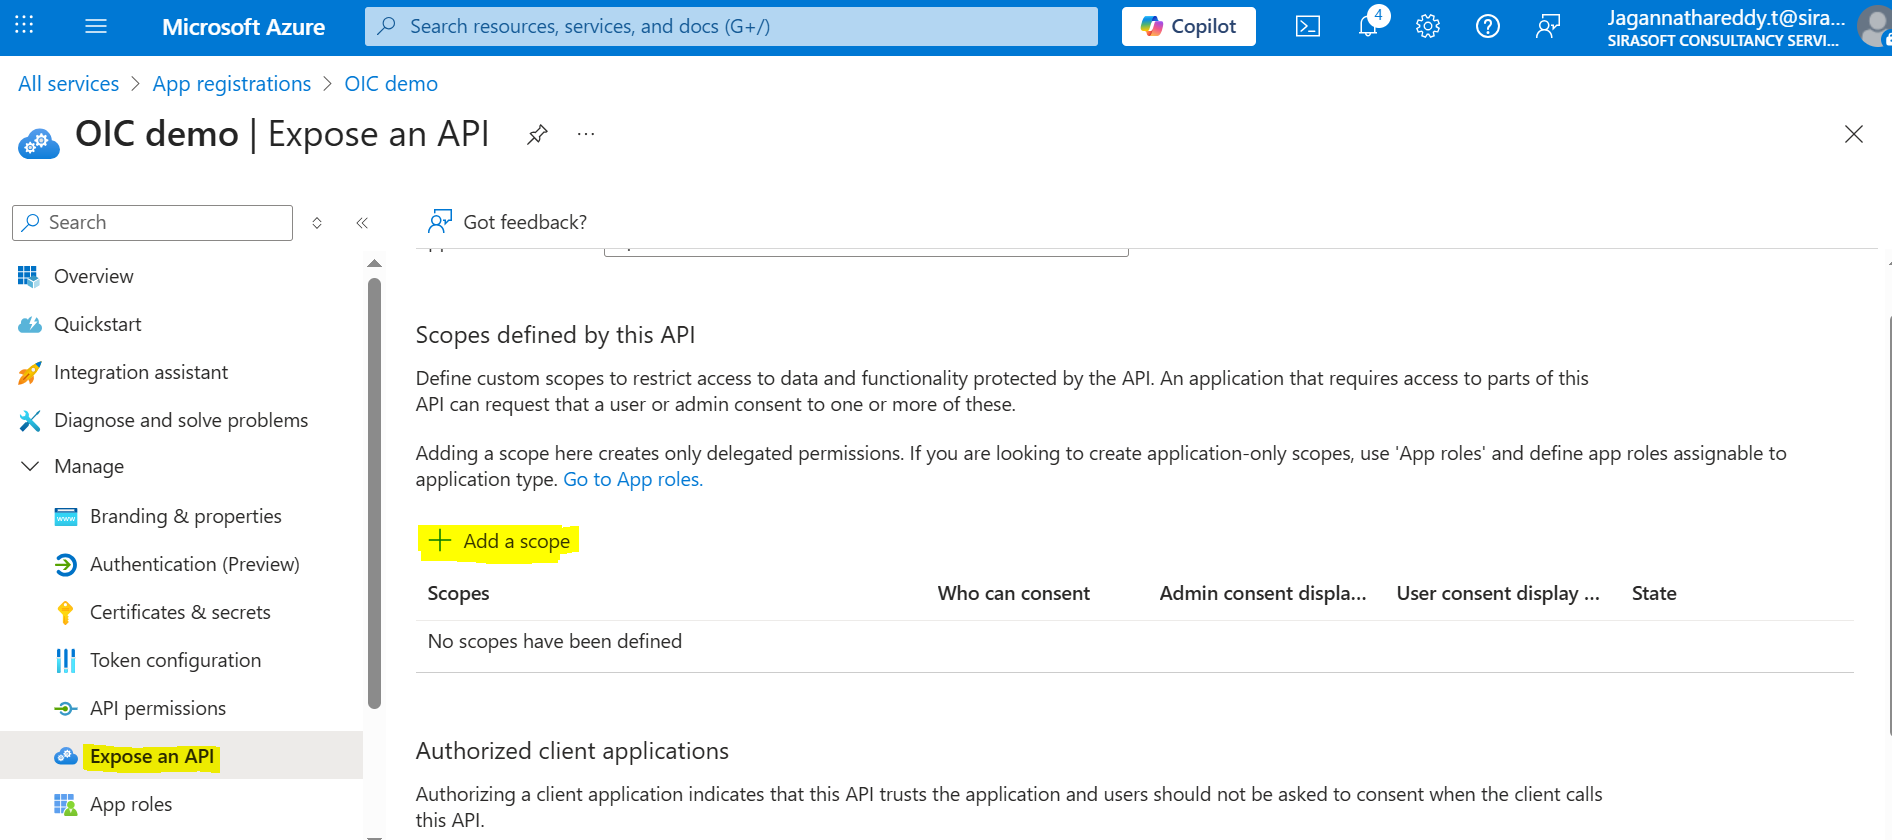
Open Expose an API and click Add a scope.
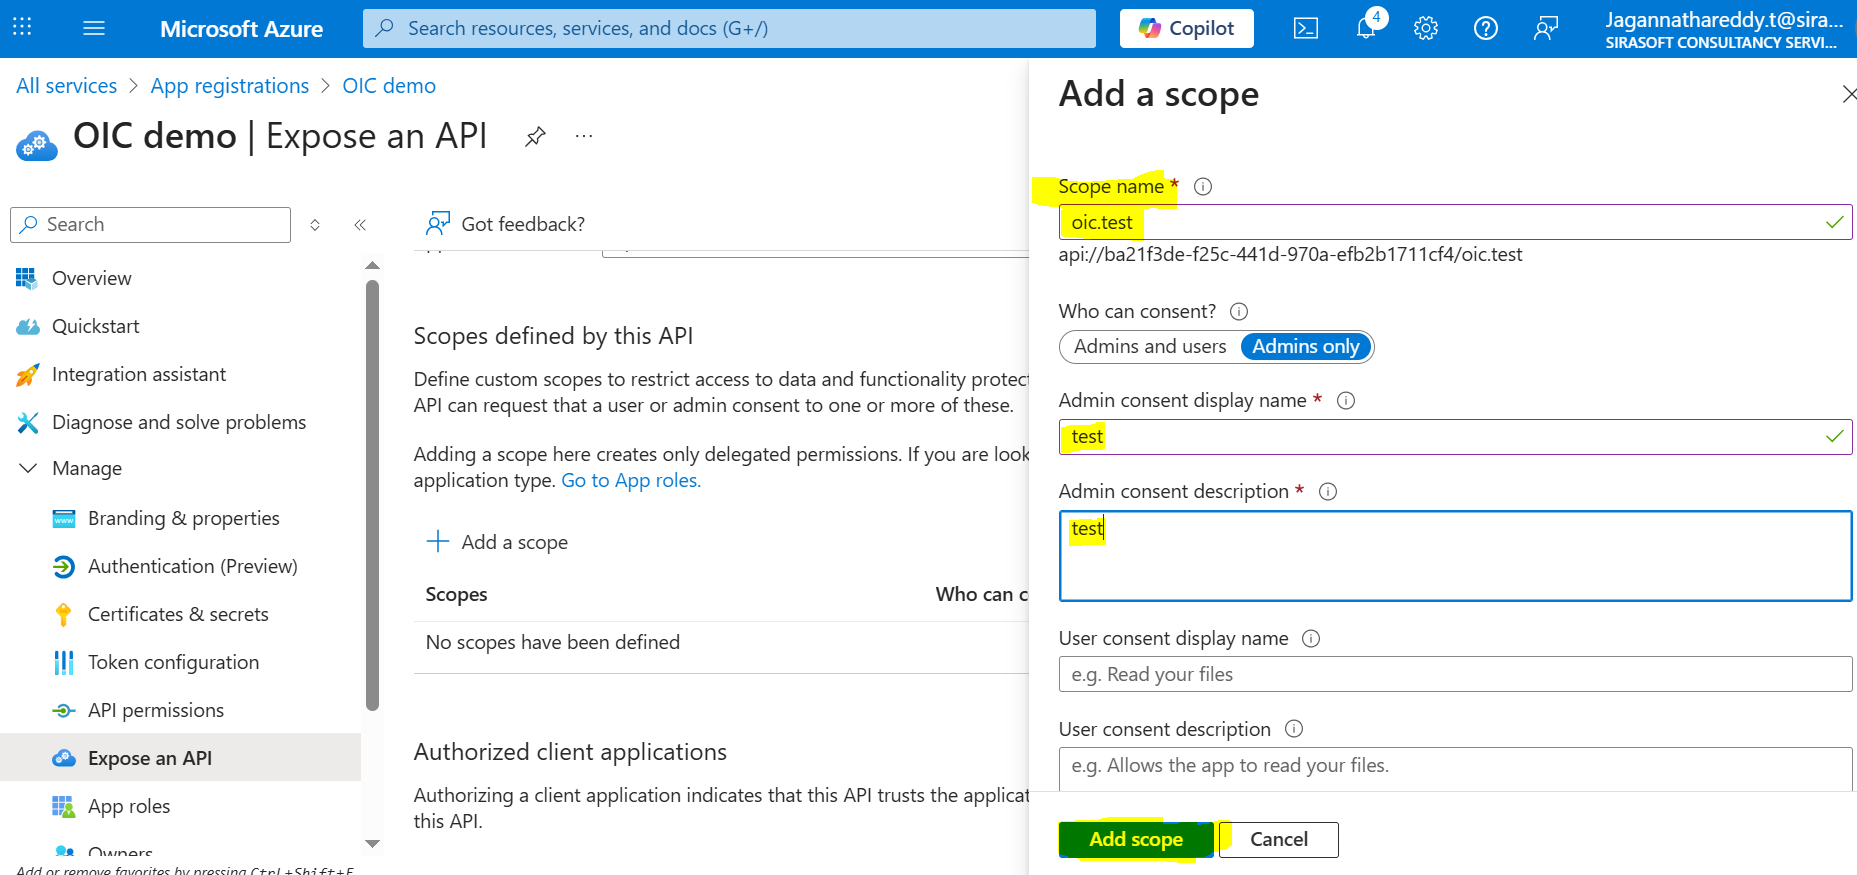
Enter the mandatory fields and click Add scope.
This is the final overview after the app registration is complete.
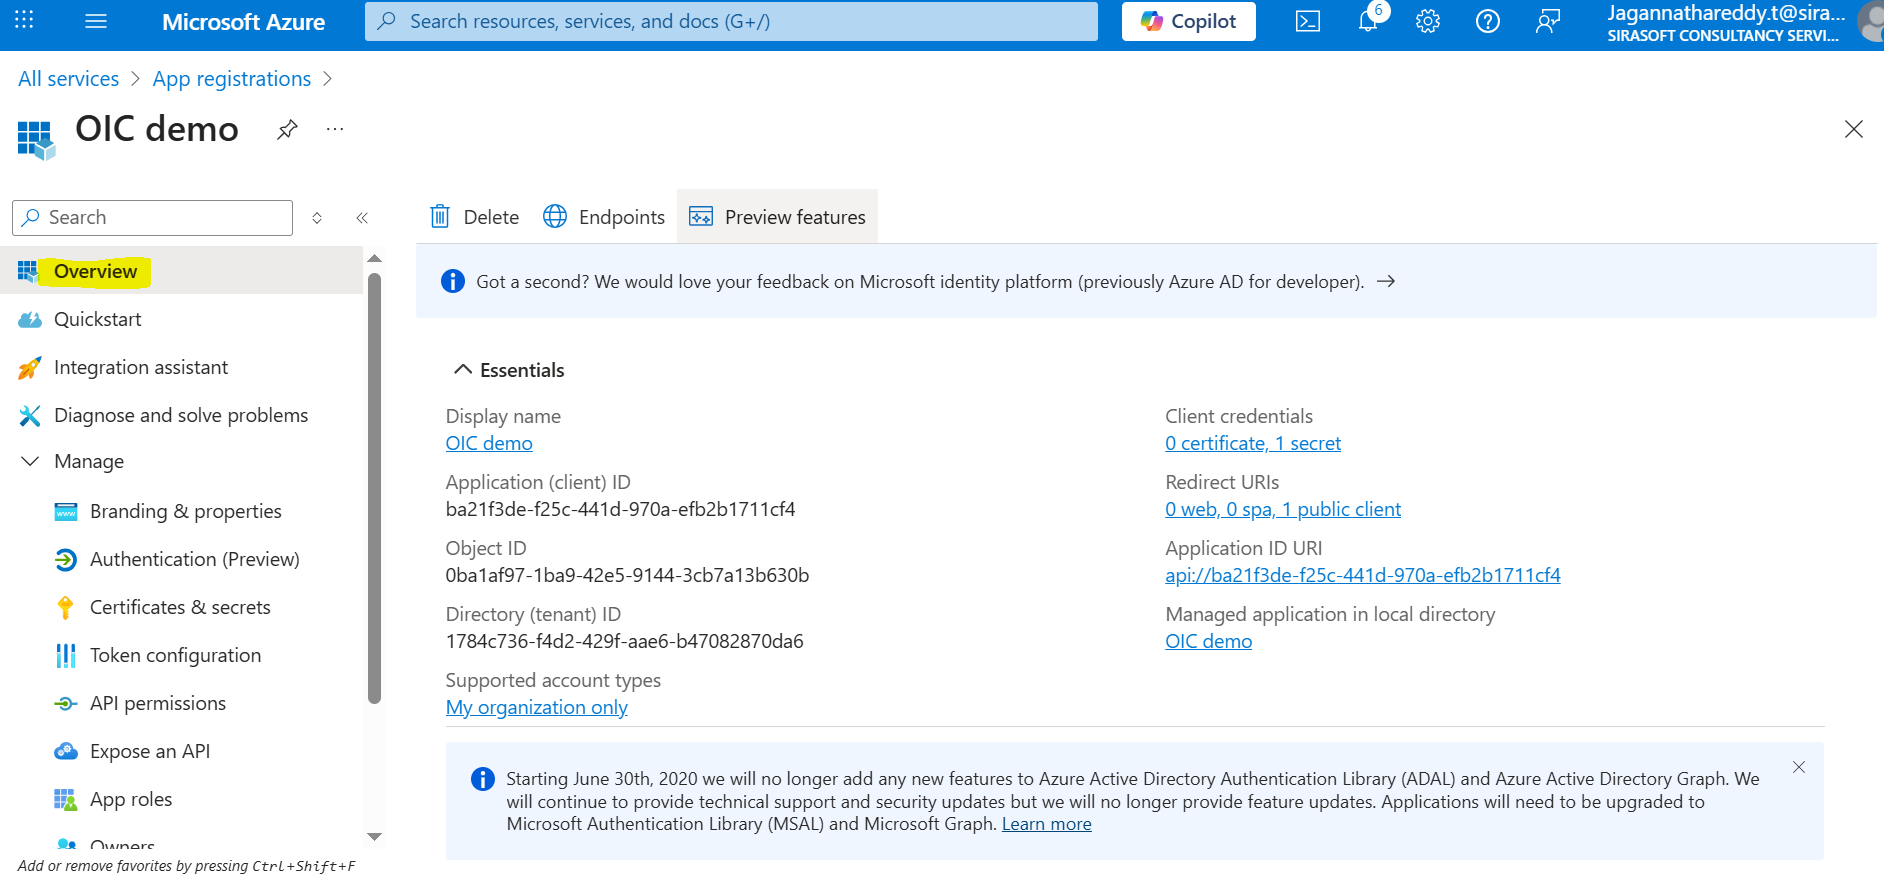
Registration Output
After registration you will have the following values. Keep the secret value confidential — treat it like a password and store it in a secure vault.
| Client ID | ba21f3de-****-****-****-************ |
| Object ID | 0ba1af97-****-****-****-************ |
| Directory (Tenant) ID | 1784c736-****-****-****-************ |
| Secret ID | f4107ce2-****-****-****-************ |
| Secret Value | •••••••• (store securely) |
| Application ID URI | api://<client-id> |
| Scope | https://graph.microsoft.com/.default |
2) Permissions to Create a New Folder in OneDrive
Choose the permission (or permissions) marked as least privileged for this API. Use a higher-privileged permission only if your app requires it. For details about delegated and application permissions, refer to the Microsoft Graph permissions reference. For OneDrive folder creation with application permissions, Files.ReadWrite.All is the key permission.
3) Testing the REST API with Postman
Before building anything in OIC, it helps to validate the Microsoft Graph calls in Postman.
Request Body
In the request body, supply a JSON representation of the DriveItem resource to create.
Example — Creating a Folder in OneDrive
Set Content-Type: application/json. The following request creates a new folder in
the user's OneDrive root folder. The @microsoft.graph.conflictBehavior property
tells the service to choose a new name if an item with the same name already exists.
If successful, this method returns a 201 Created response code and a DriveItem resource in the response body.
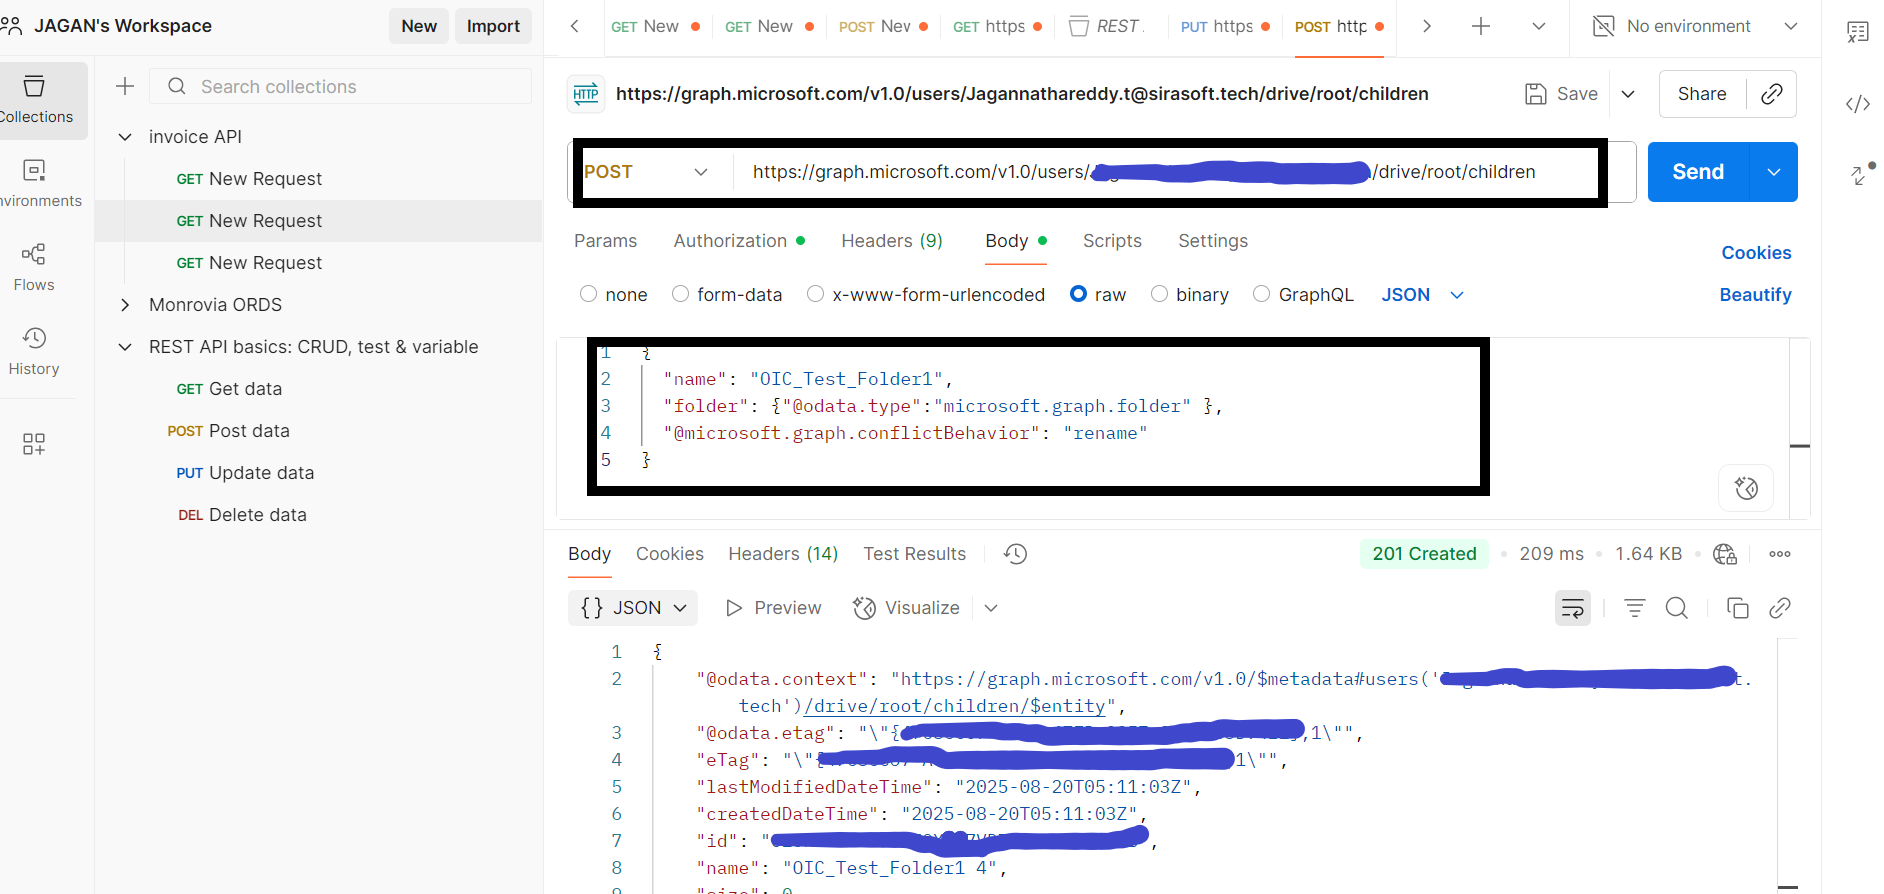
Postman response — 201 Created with the new DriveItem.
You can also create a file inside the folder directly through the REST API from Postman:
The request payload is the content you want to write into the file.
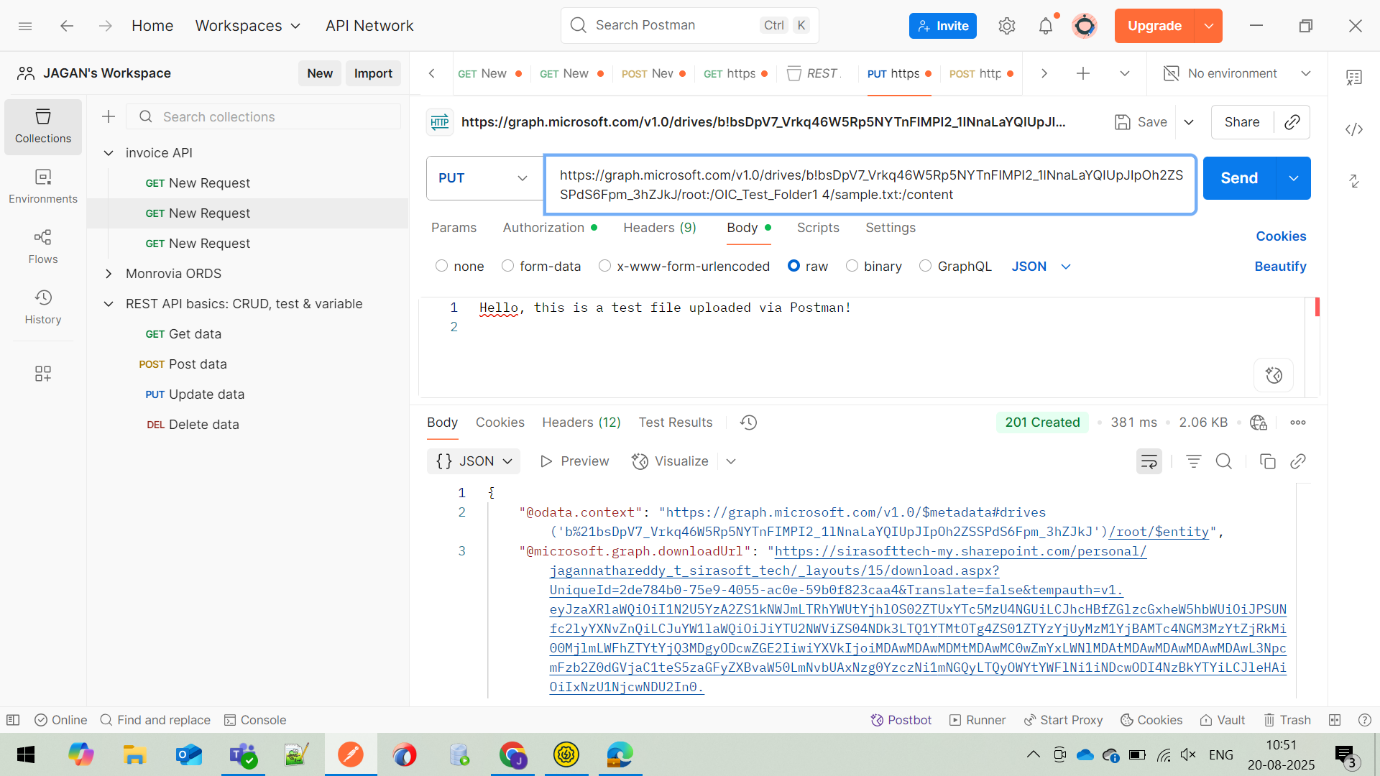
Uploading file content into the folder via a PUT request.
4) OneDrive Folder Creation through OIC
Pre-Requisites
From your Azure App Registration, gather the following:
- Tenant ID
- Client ID (Application ID)
- Client Secret
- Scope: https://graph.microsoft.com/.default
- Token URL: https://login.microsoftonline.com/{tenantId}/oauth2/v2.0/token
Create a REST Connection in OIC
In the OIC Console, go to Connections → Create → REST Adapter and configure:
- Name: e.g. MS_OneDrive_REST
- Connection Type: REST
- Base URI: https://graph.microsoft.com/v1.0
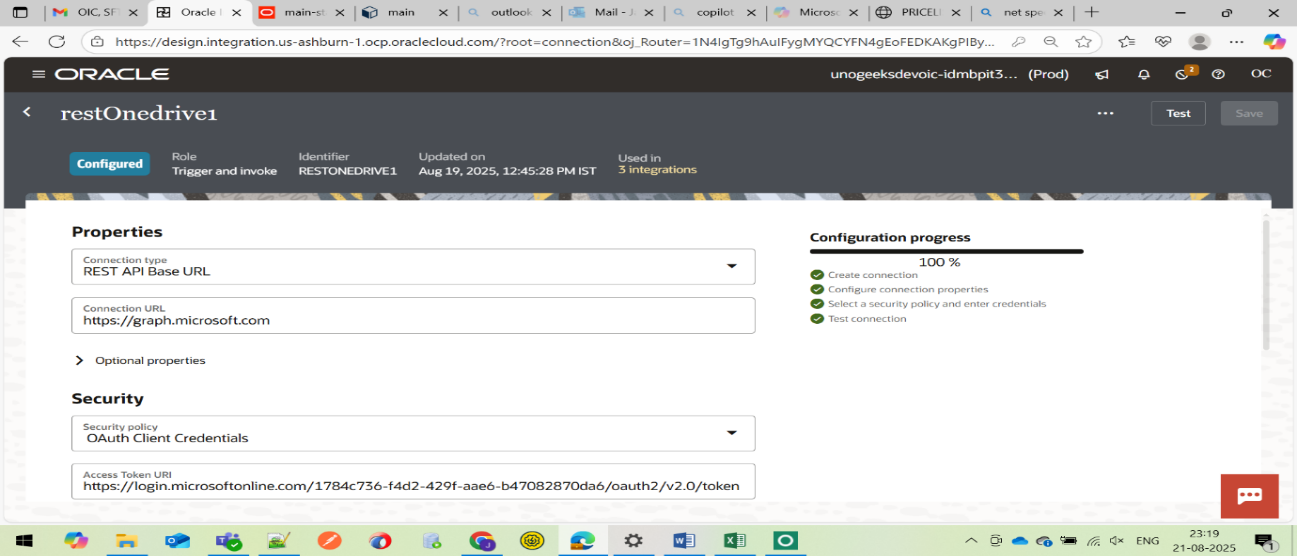
Configuring the REST adapter connection in OIC.
Then configure security using OAuth 2.0:
- Authentication Type: OAuth 2.0
- Grant Type: Client Credentials
- Client ID: <your client id>
- Client Secret: <your client secret>
- Token Endpoint: https://login.microsoftonline.com/{tenantId}/oauth2/v2.0/token
- Scope: https://graph.microsoft.com/.default
Save and test the connection.
Create a Scheduled Integration
In OIC, go to Integrations → Create → Scheduled Orchestration and give it a name — for example, CreateOneDriveFolder.
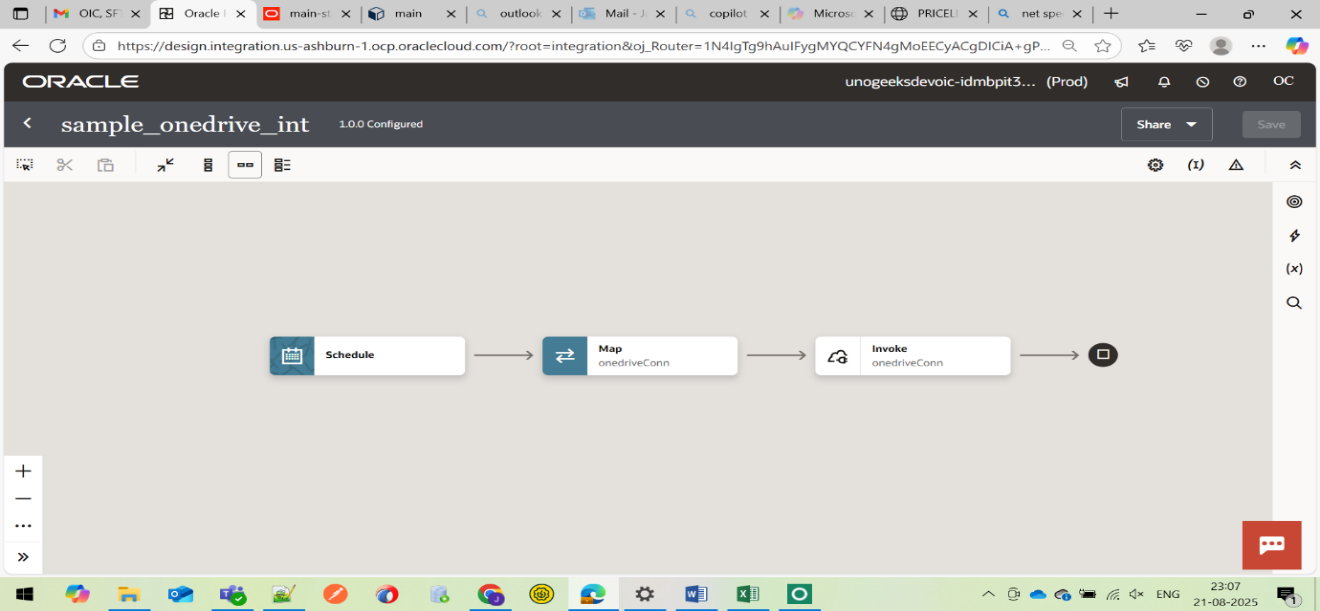
Creating a scheduled orchestration integration.
Add the OneDrive REST Invoke
Drag and drop your Microsoft OneDrive REST connection into the flow, select the POST method, and enter the relative resource URI:
Define the request payload:
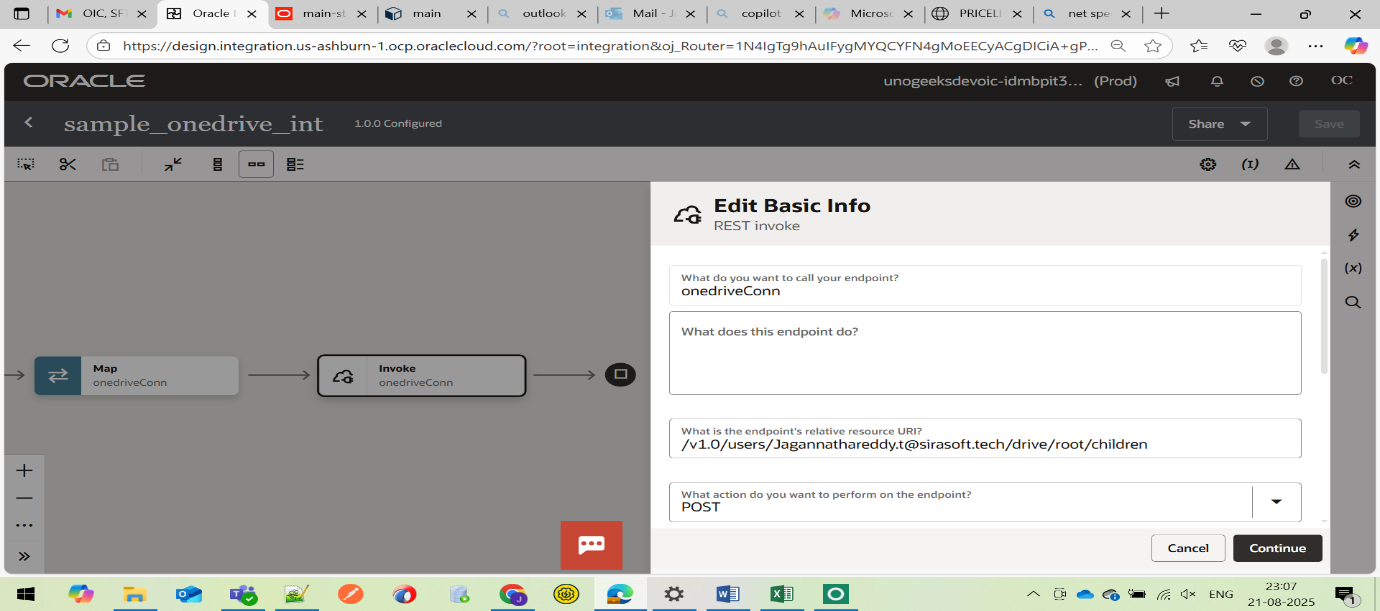
Configuring the POST invoke and request payload.
You can hardcode the folder name inside the request so that each scheduled run creates a folder.
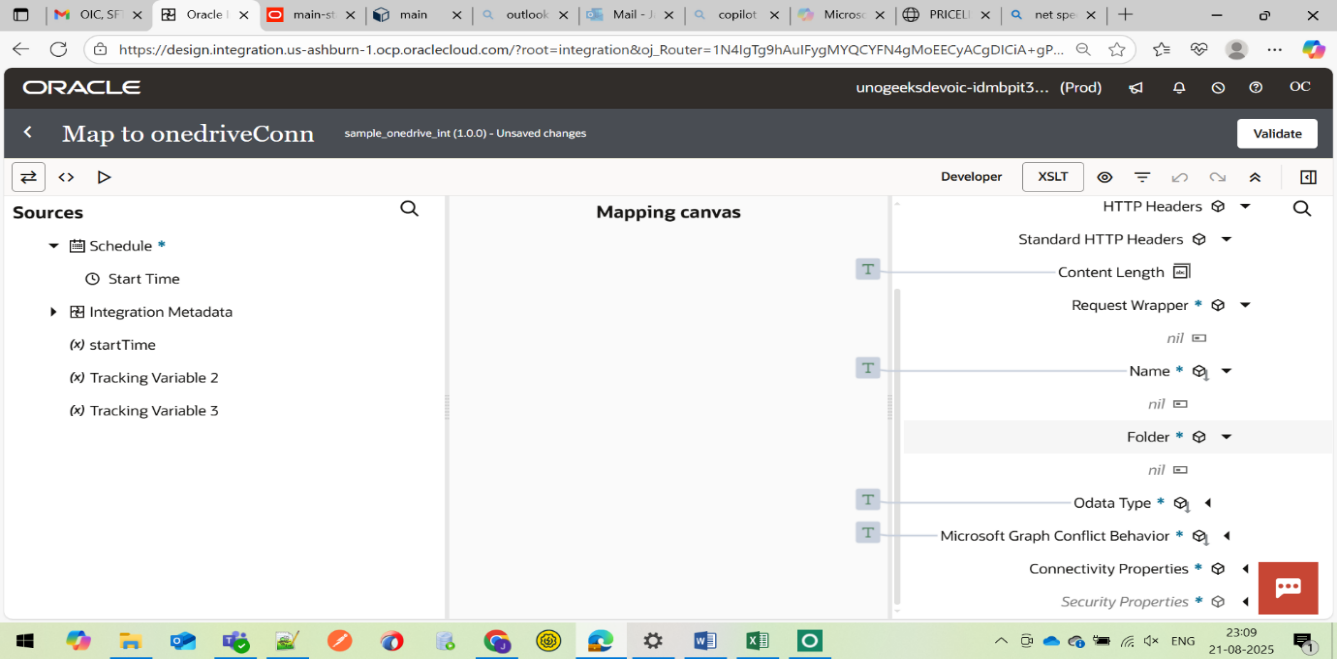
Each scheduled run creates a folder in OneDrive.
5) Loading BIP Report Data into OneDrive through Integration
In this integration, we take a BI Publisher (BIP) report from Oracle Fusion, which contains business data in formats like CSV, Excel, or XML. Using Oracle Integration Cloud, we connect to BIP, download the report, and move it as a file into OneDrive.
The purpose is to automate data sharing. Instead of manually downloading reports and uploading them to OneDrive, the integration makes the process automatic, faster, and error-free. In short:
- BIP → Source of data (the report)
- OIC → Bridge (the integration flow)
- OneDrive → Destination to store the file
Create the SOAP Connection (BIP)
- Go to Connections in OIC
- Create a new connection with type SOAP Adapter
- Enter the BIP WSDL URL, e.g. https://<host>/xmlpserver/services/PublicReportService?wsdl
- Add credentials (a Fusion user with the BI Consumer / Author role)
- Test and save the connection
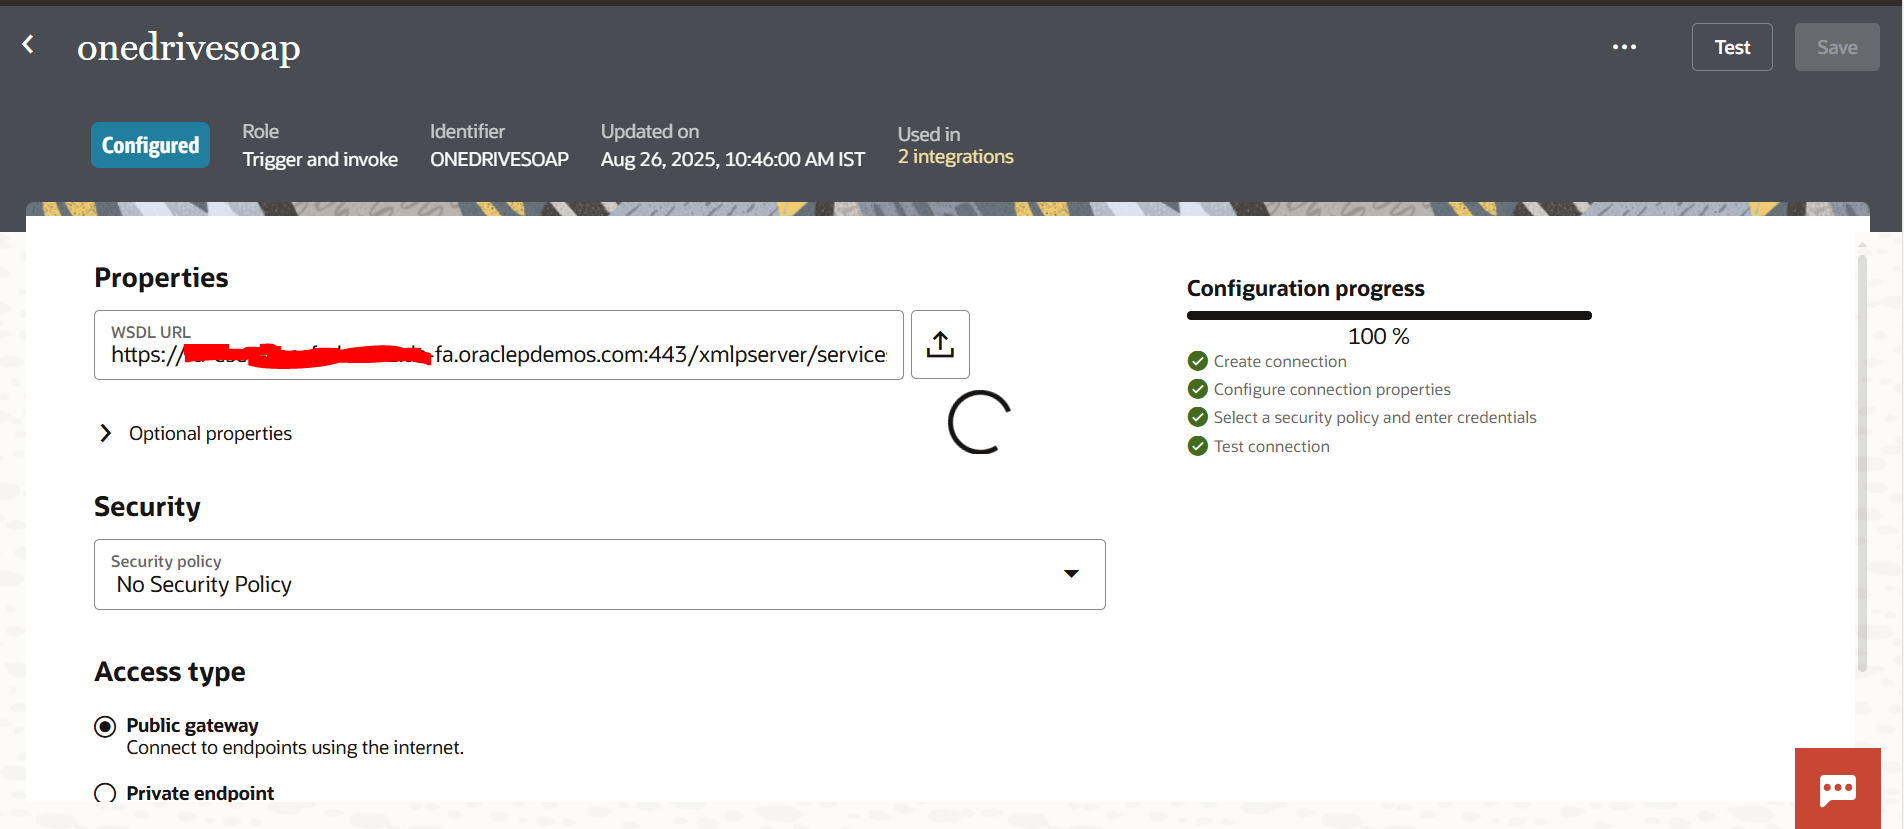
Configuring the SOAP adapter for BI Publisher.
Create the REST Connection
Create the Microsoft OneDrive REST connection exactly as described in section 4 (Base URI
https://graph.microsoft.com/v1.0) with OAuth 2.0 client-credentials security
— Client ID, Client Secret, token endpoint, and the
https://graph.microsoft.com/.default scope. Save and test the connection.
Build the Integration
Choose a Scheduled or App-driven integration.
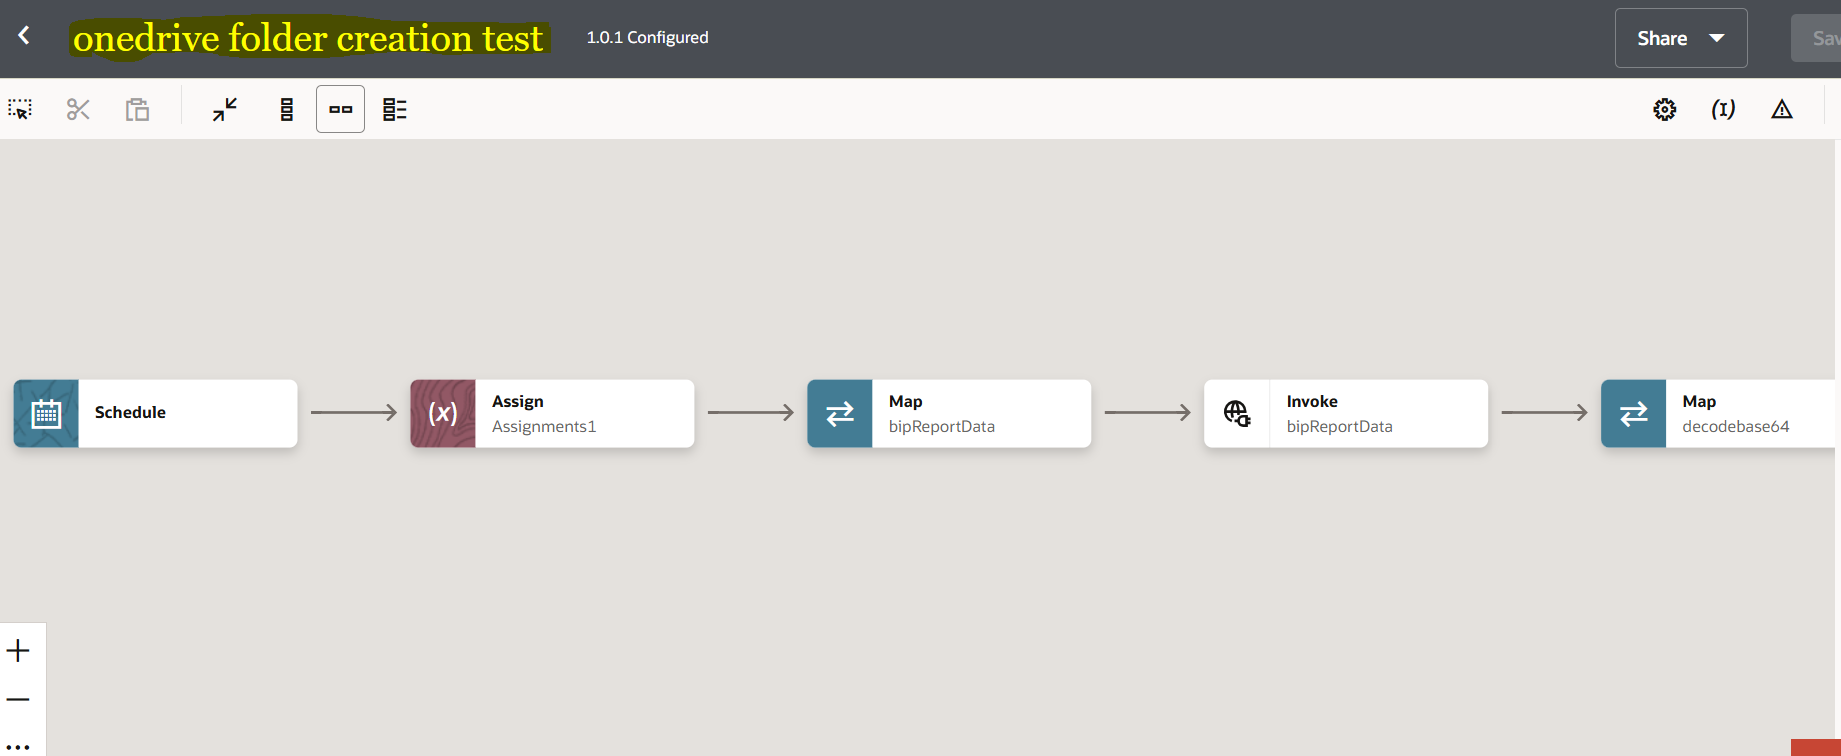
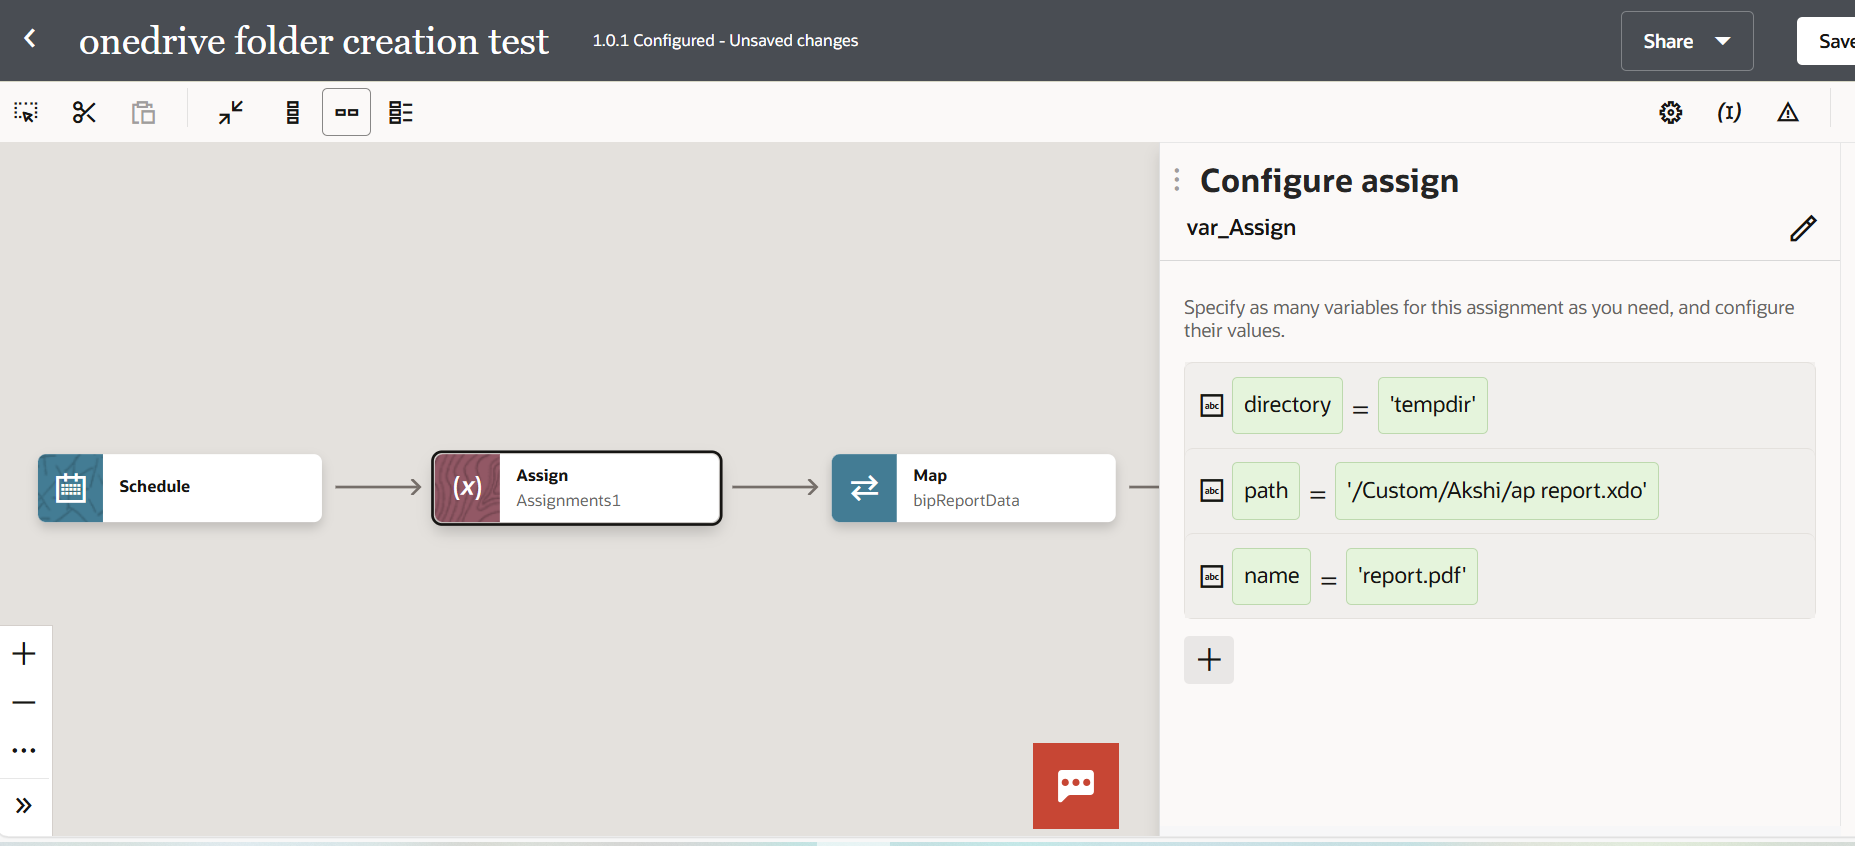
Add an Assign action and assign the necessary variables.
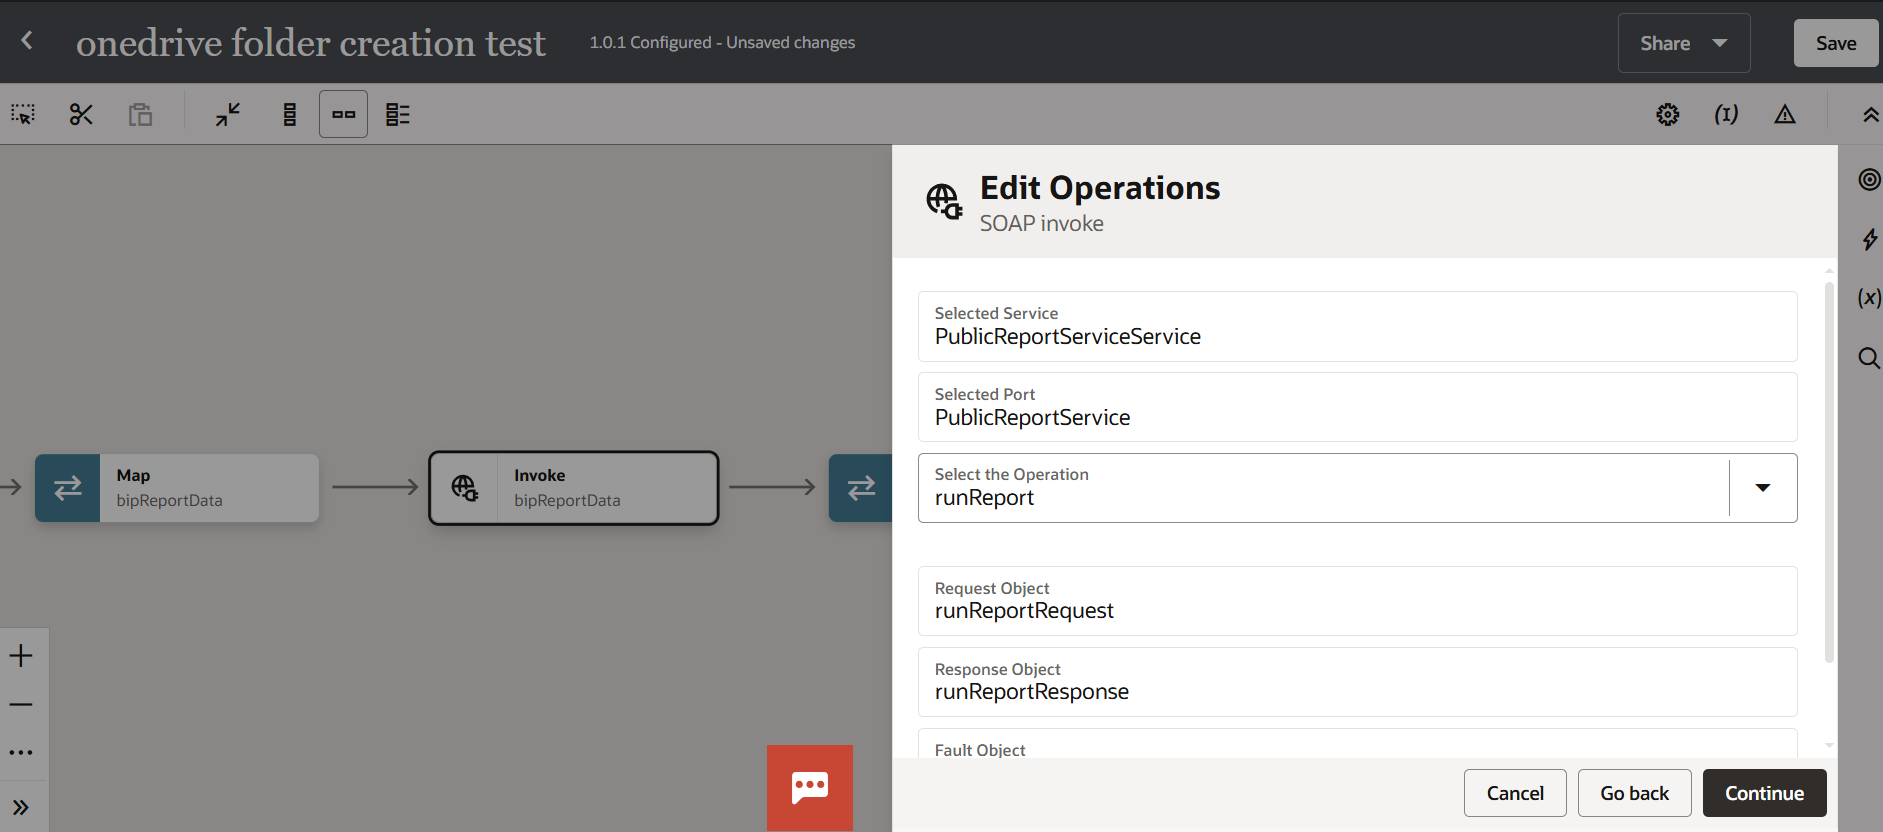
Invoke the SOAP connection and select the operation runReport.
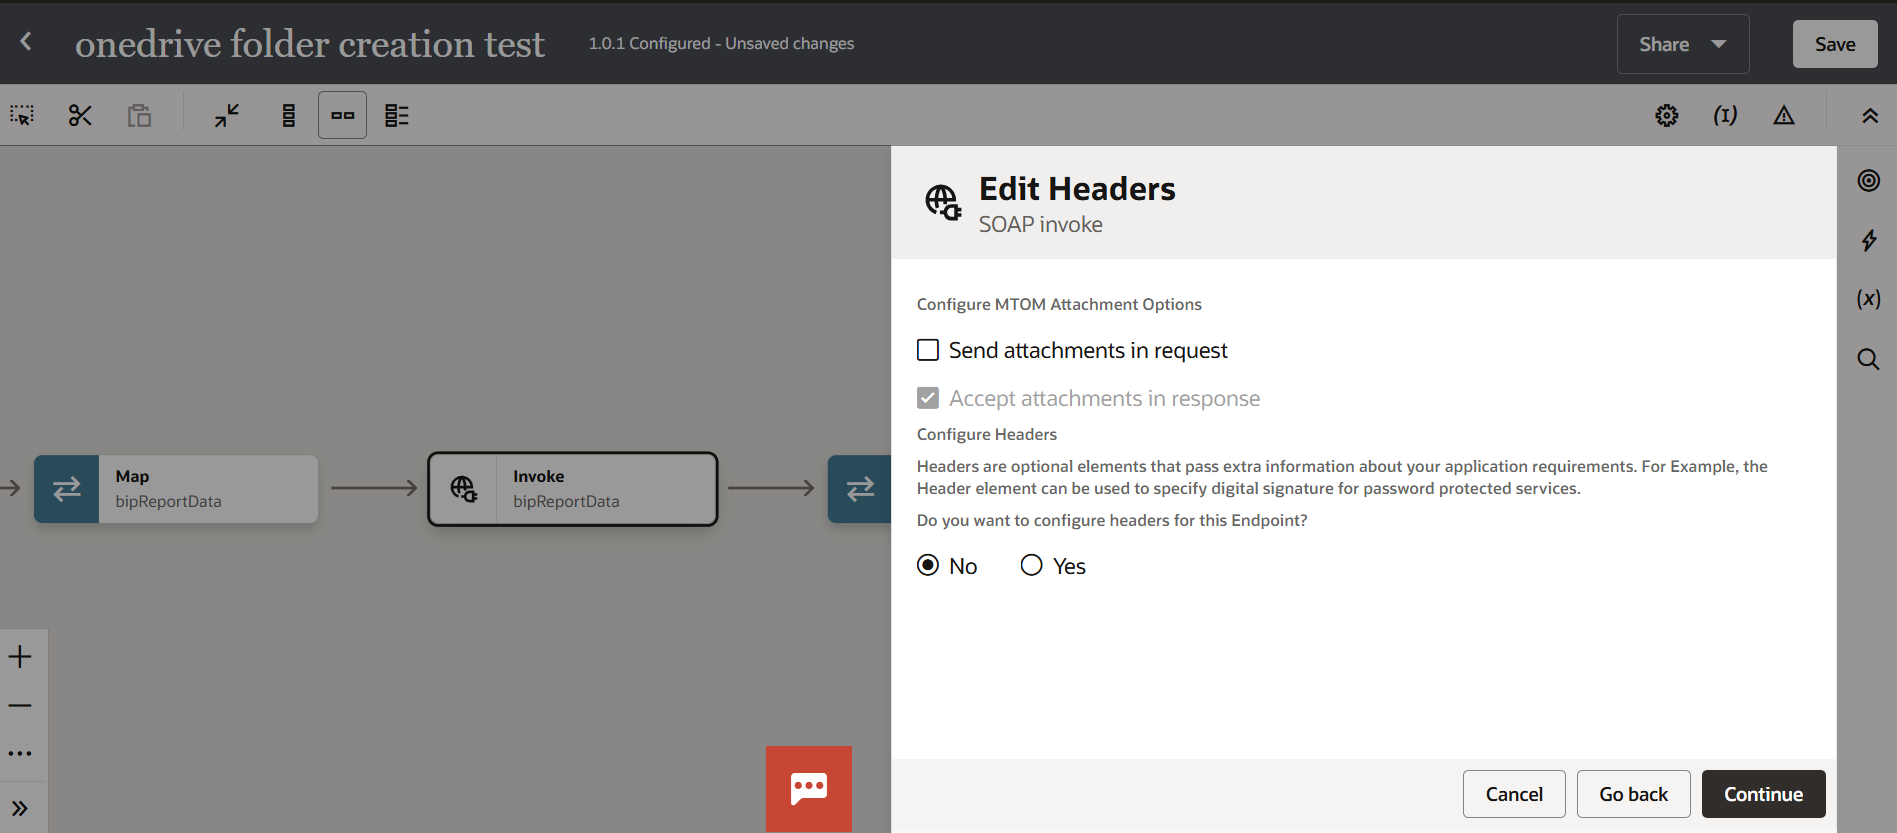
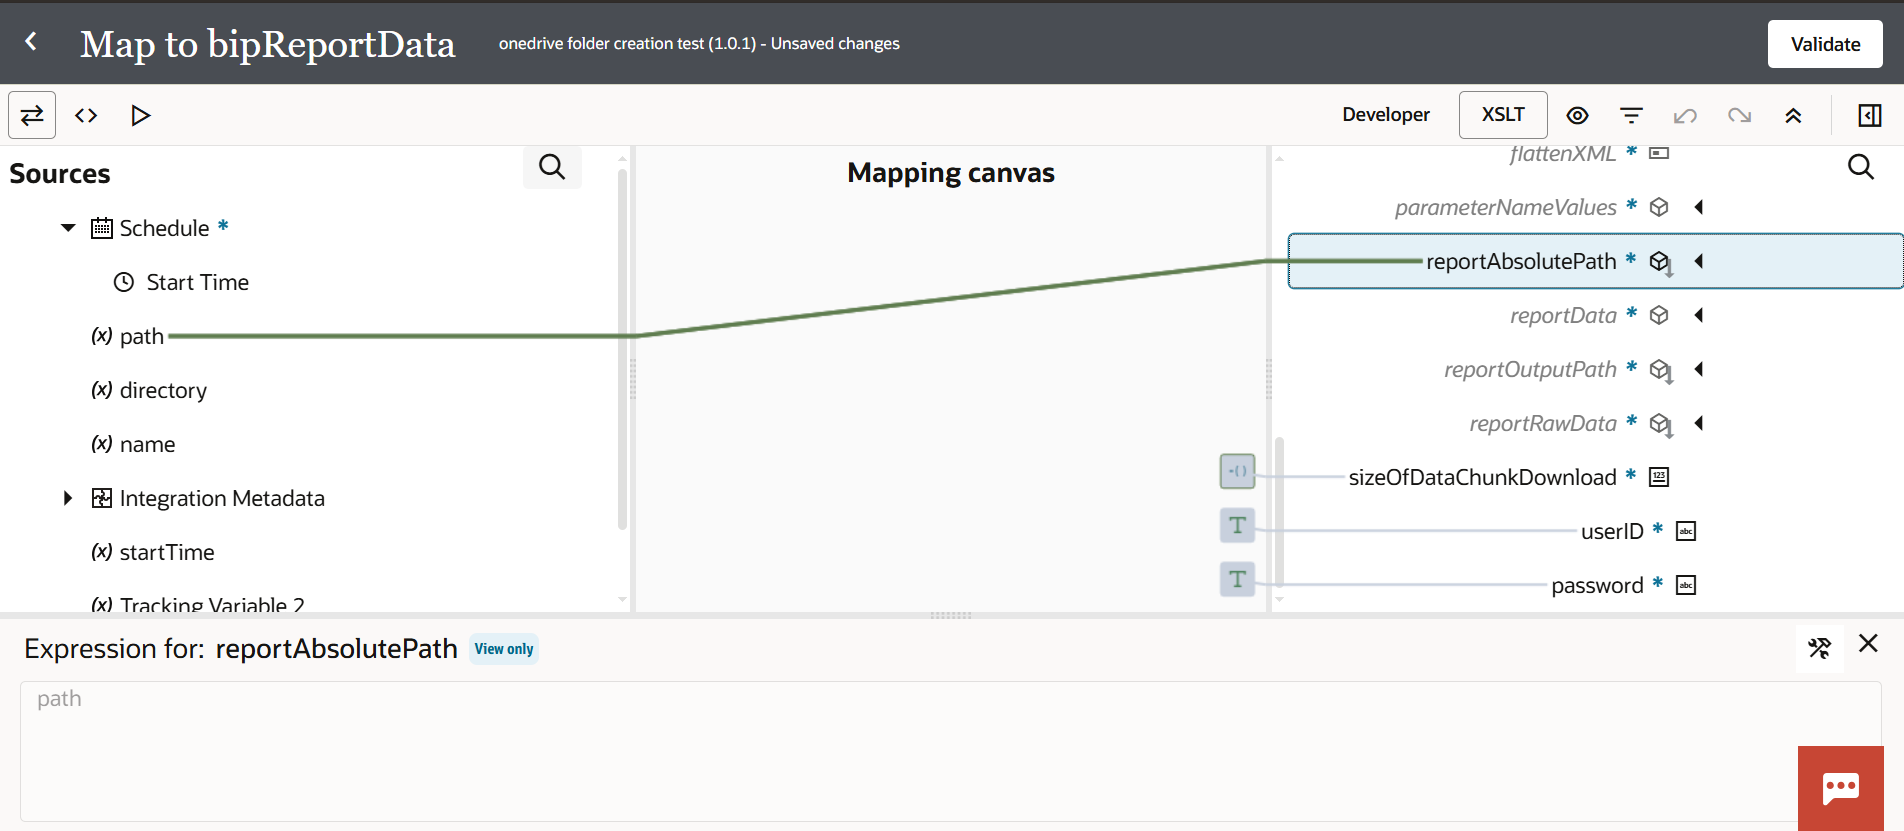
Provide the report path from the Assign and hardcode the remaining values:
- attributeFormat = 'pdf'
- sizeOfDataChunkDownload = '-1'
- userID and password of Fusion
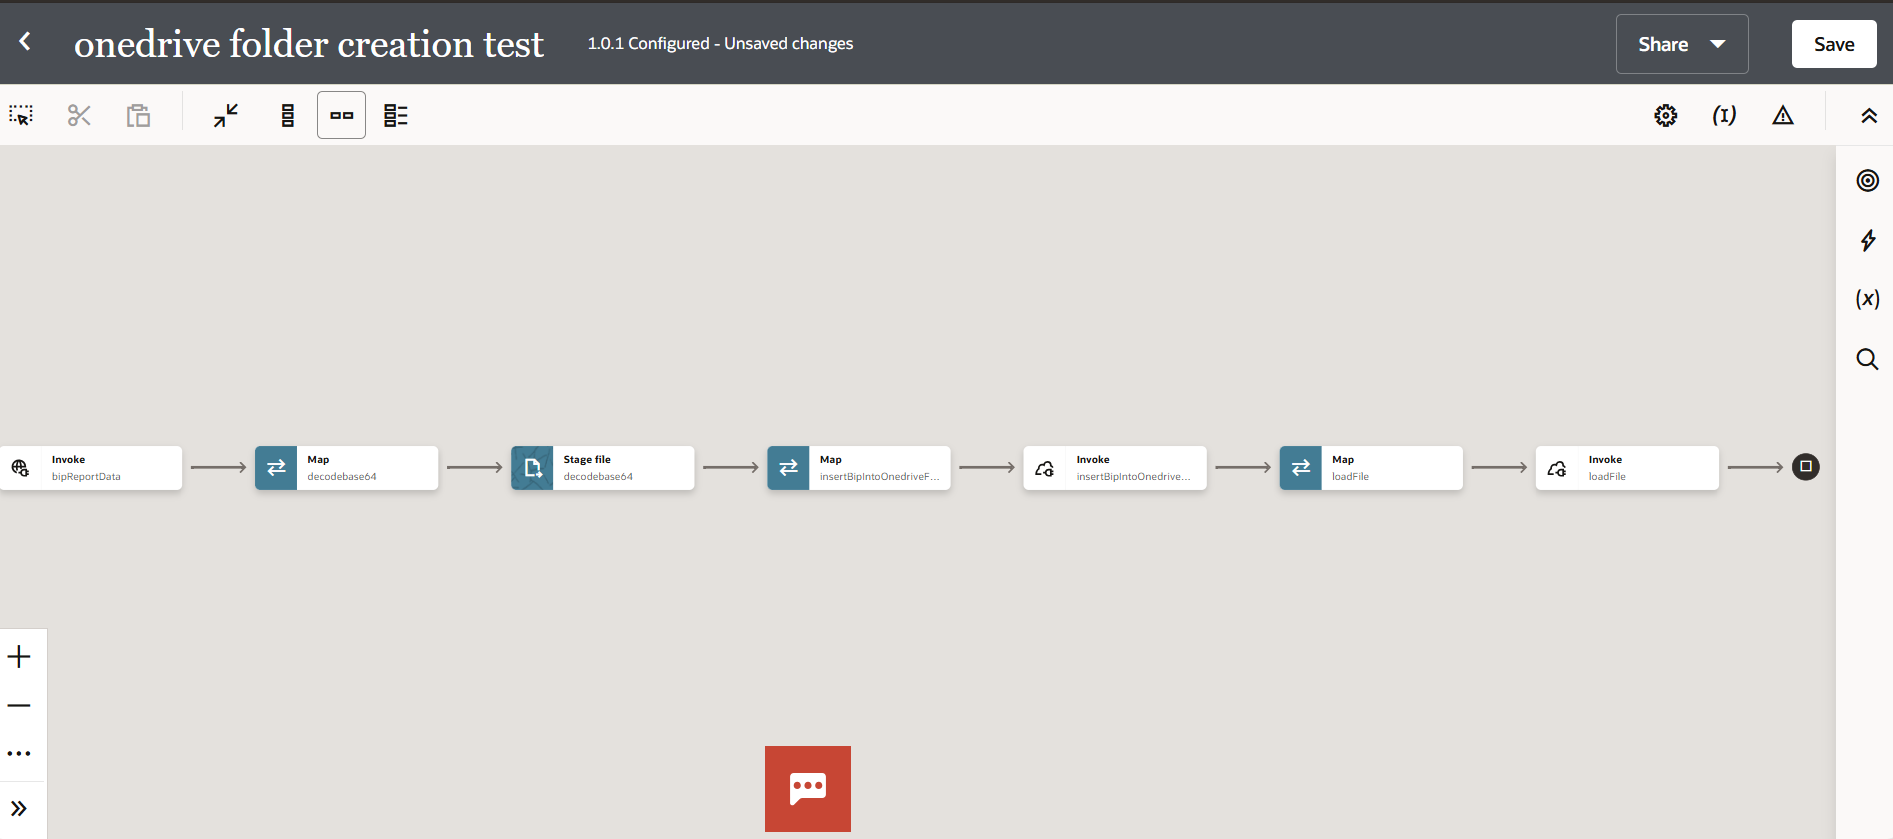
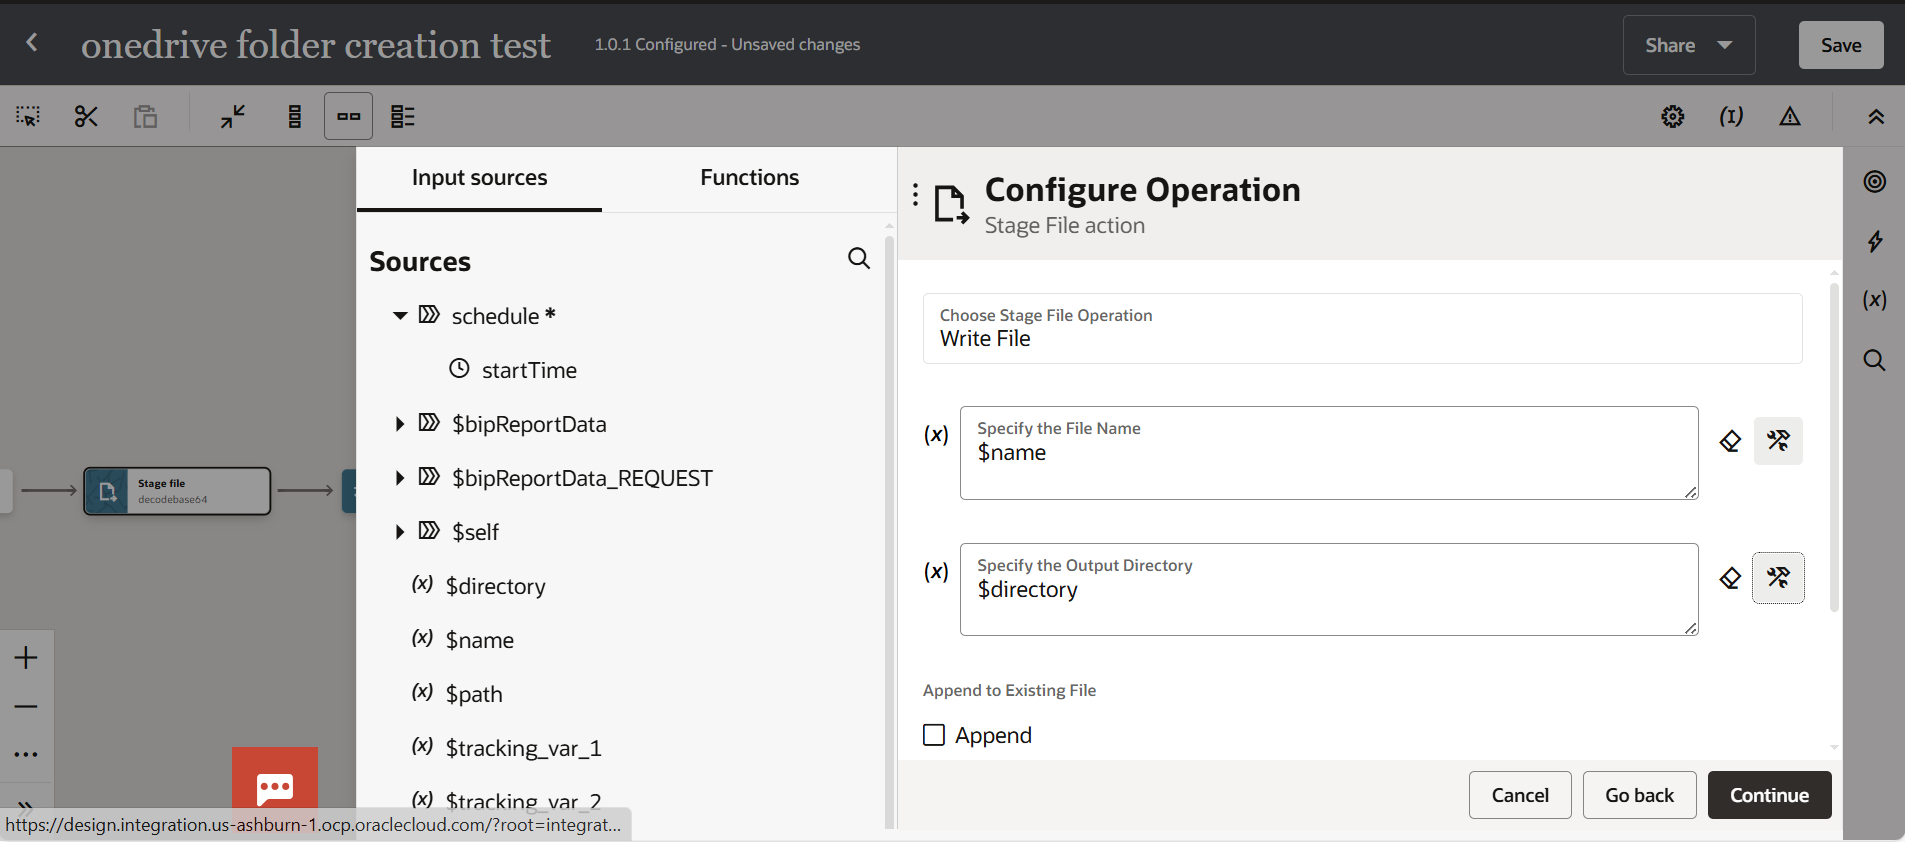
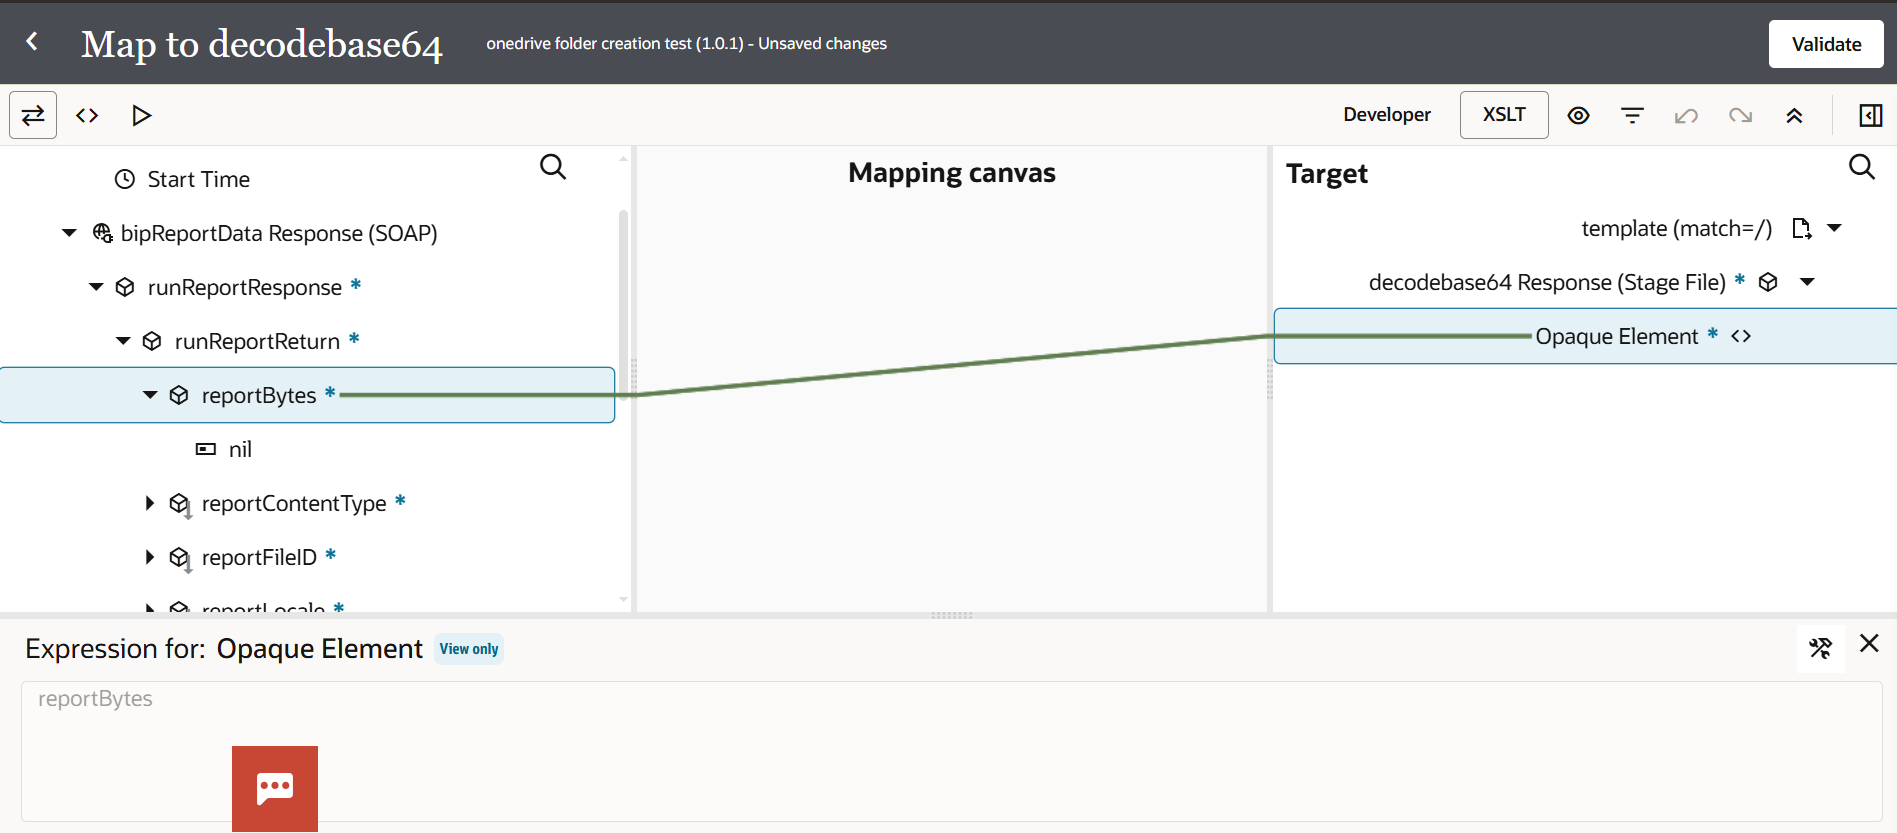
Use a Stage File action to write the Base64 output into a file.
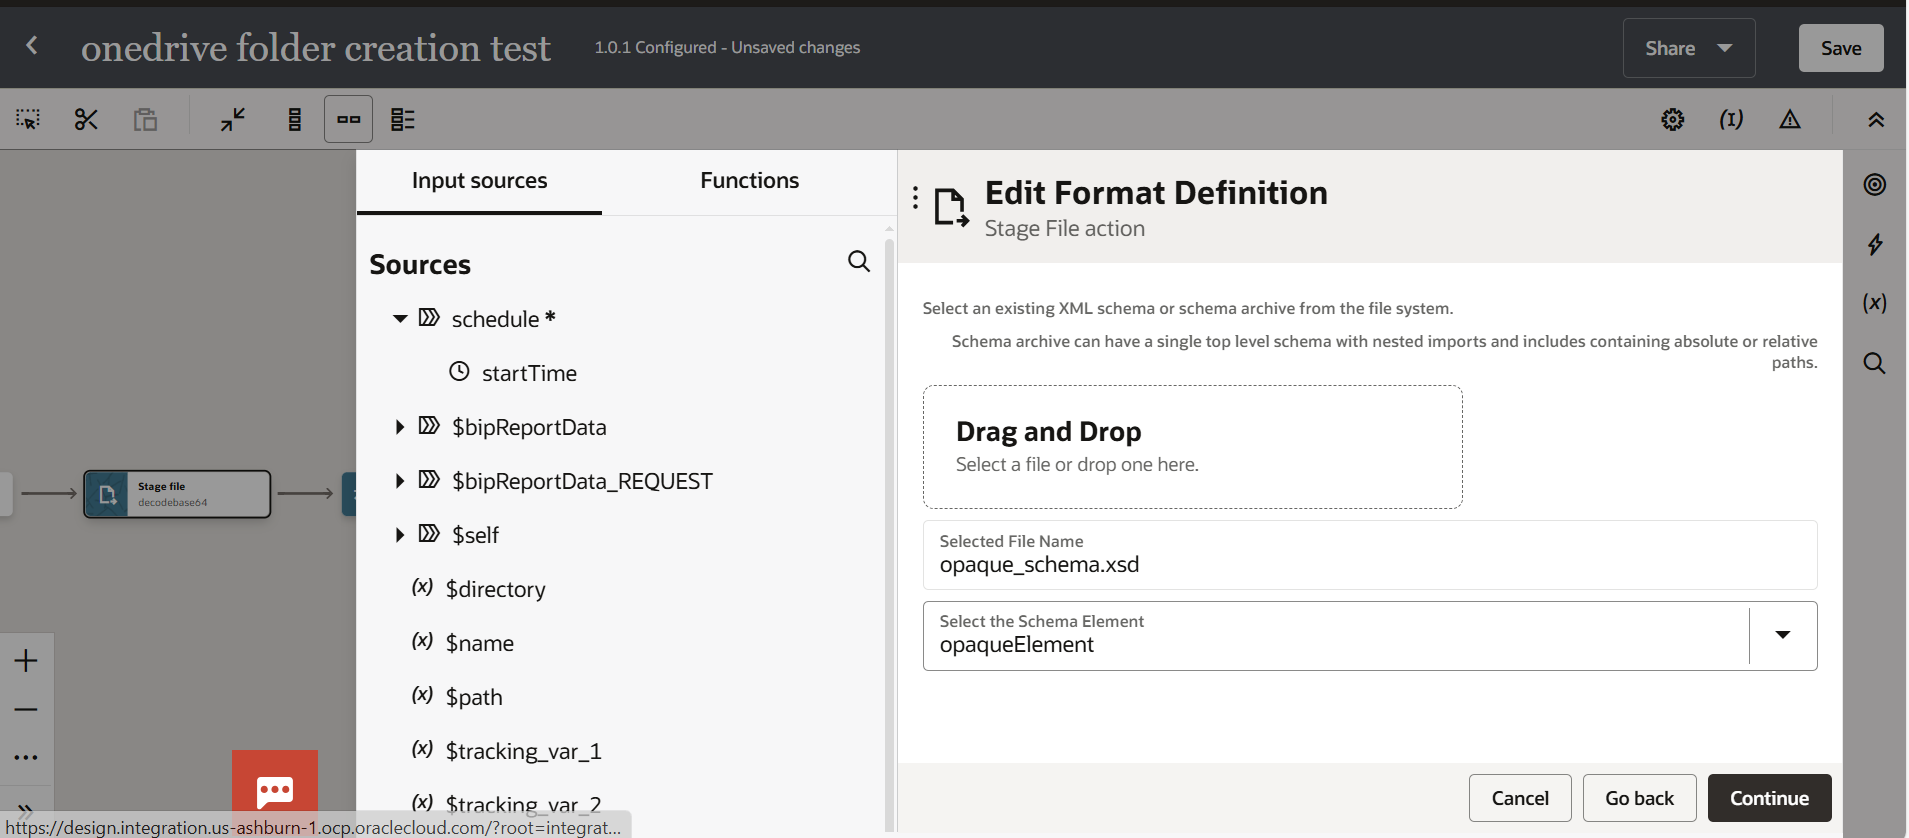
Add an Opaque schema file.
Map reportBytes to the opaque element.
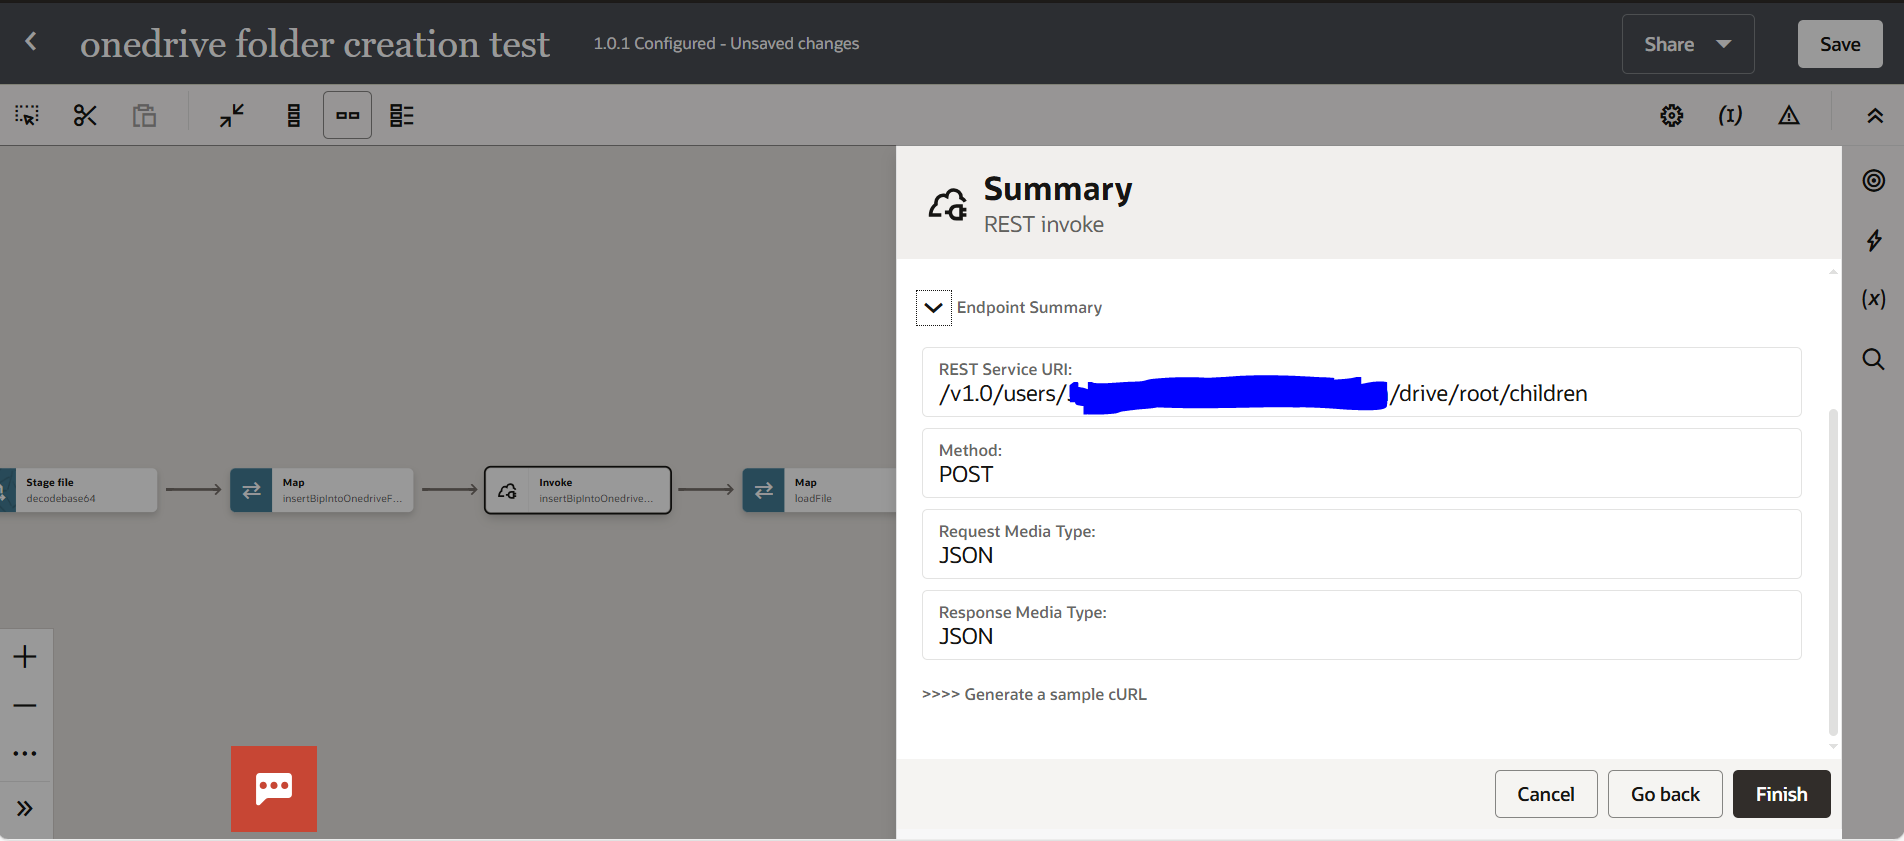
Invoke the REST connection to create the folder first. Add the endpoint URI and use the POST method.
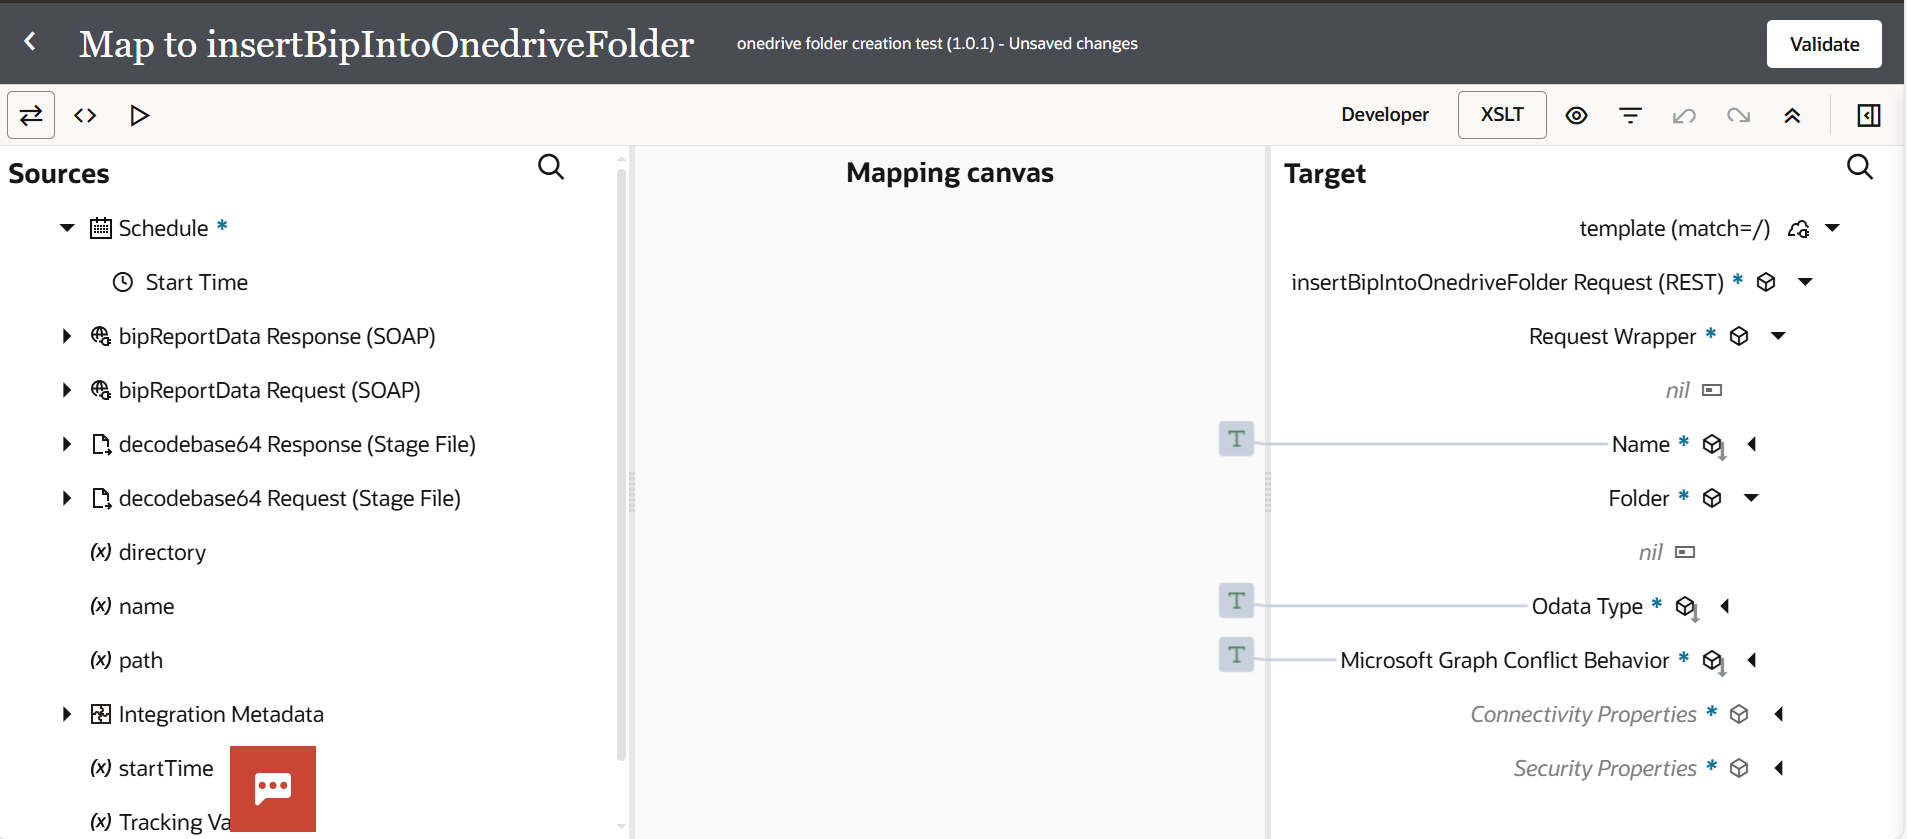
In the mapper, hardcode these values:
- name = 'folder_name'
- @odata.type = 'microsoft.graph.folder'
- @microsoft.graph.conflictBehavior = 'rename' (renames the new folder if one already exists)
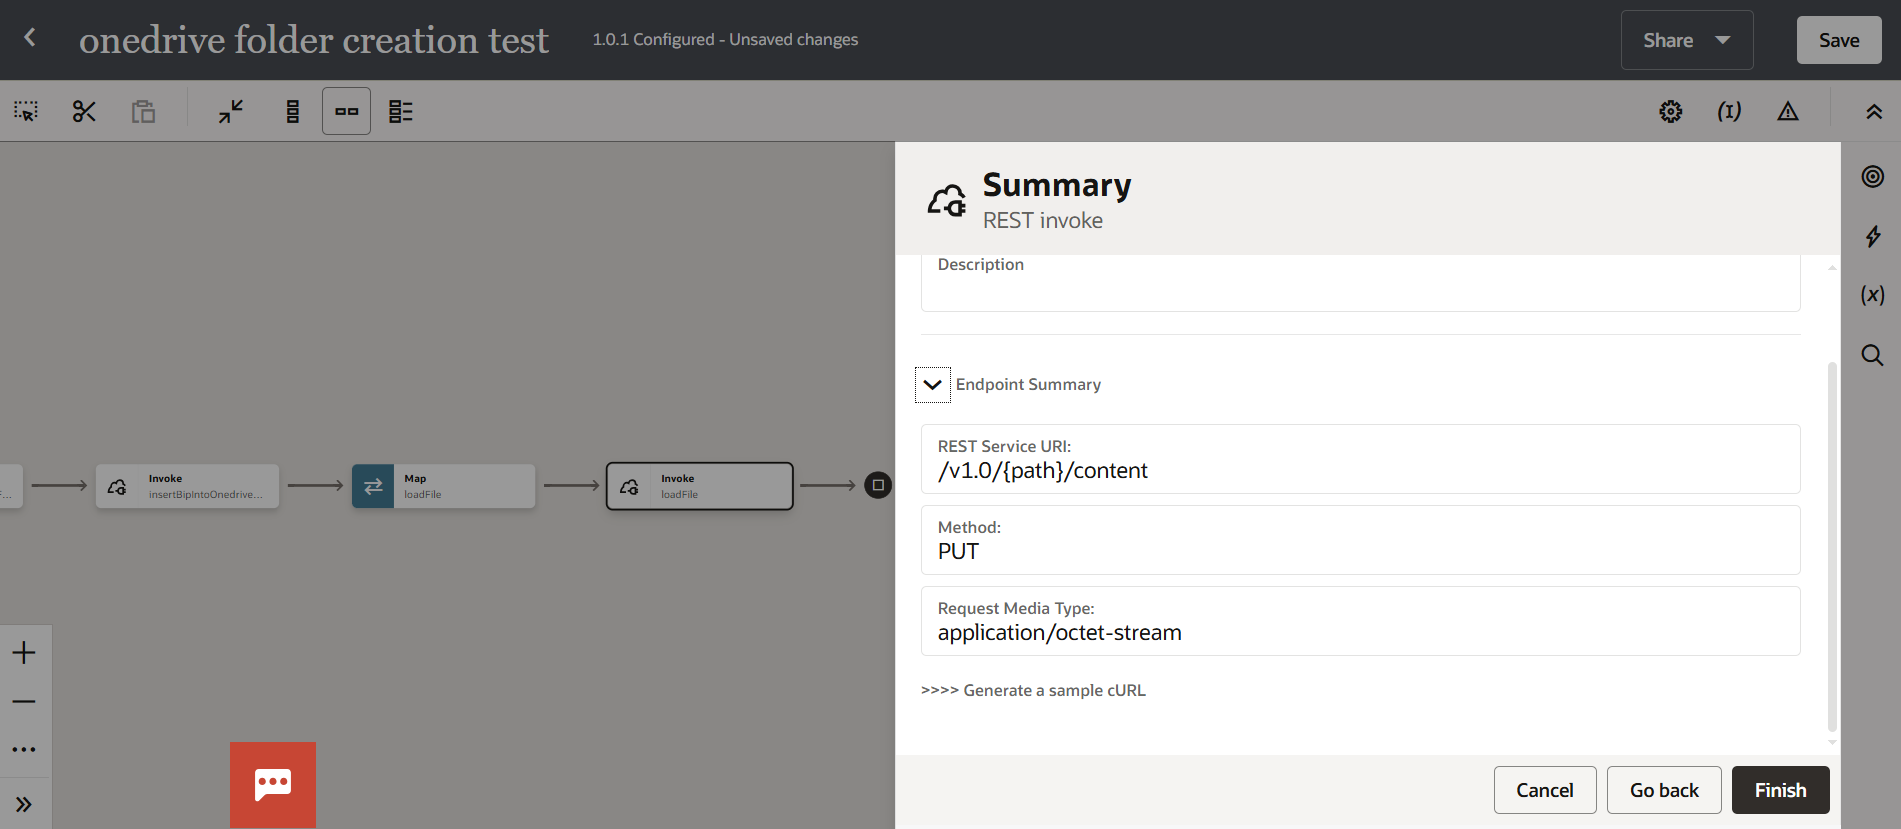
Invoke the REST connection again to load the data. Use the
PUT method with request media type
application/octet-stream.
In the mapper, give the path of the folder created in OneDrive and map the file reference to the stream reference so the binary file is passed into that OneDrive folder.
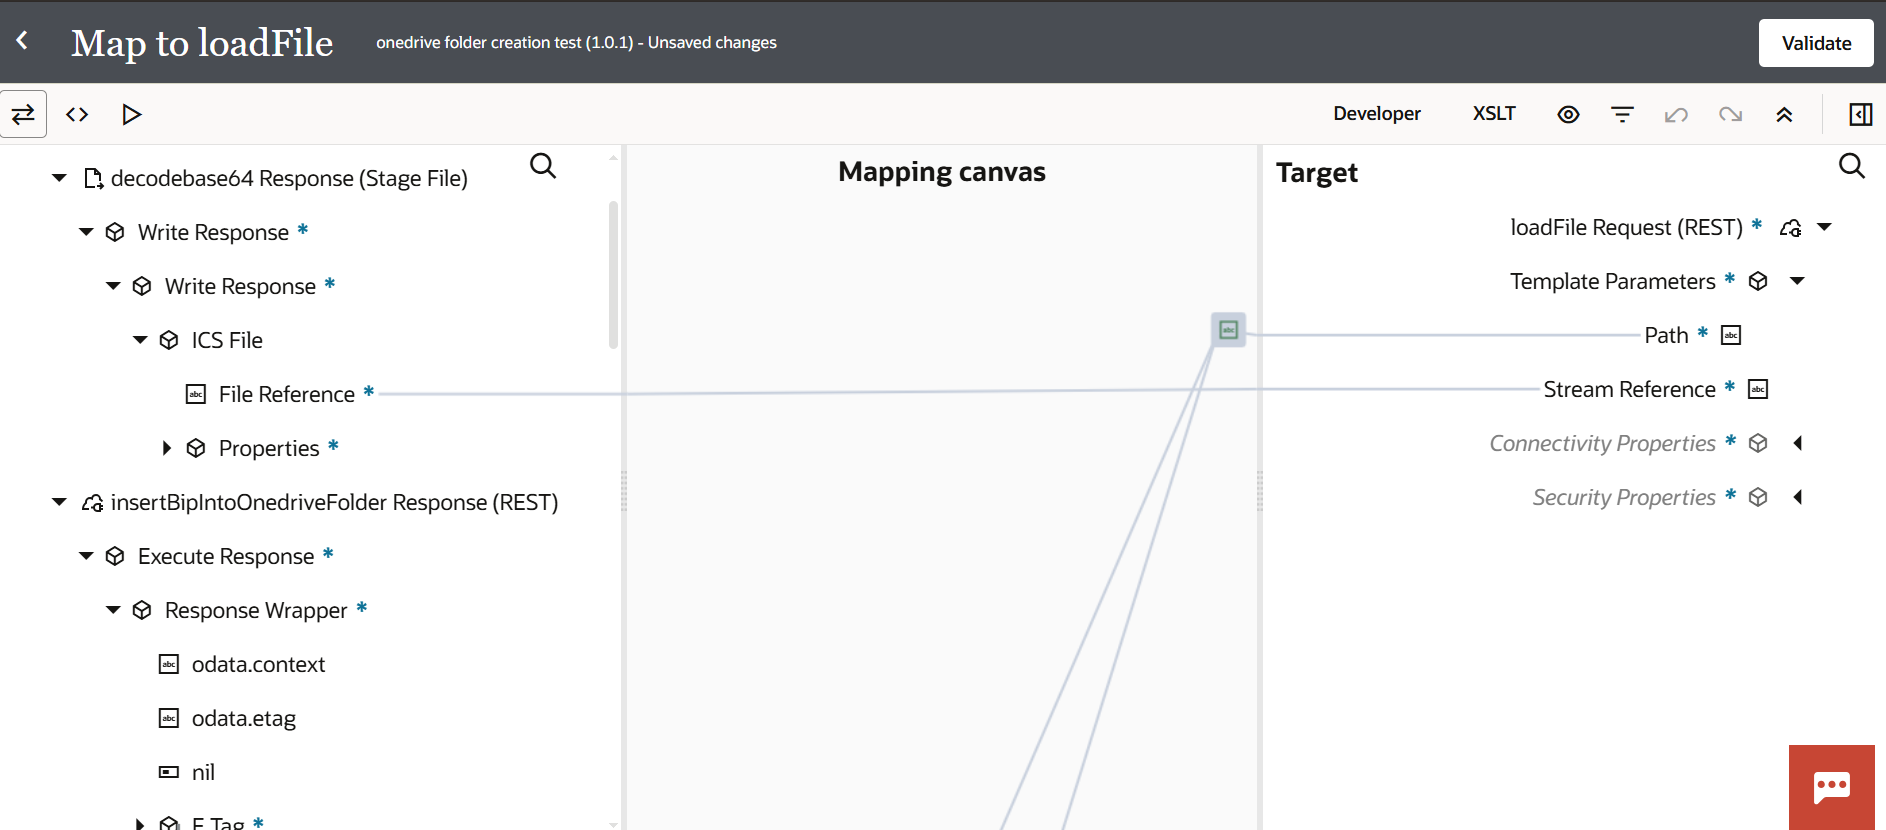
This integration creates a folder, pulls the report data from Fusion, and places that data into the created folder.
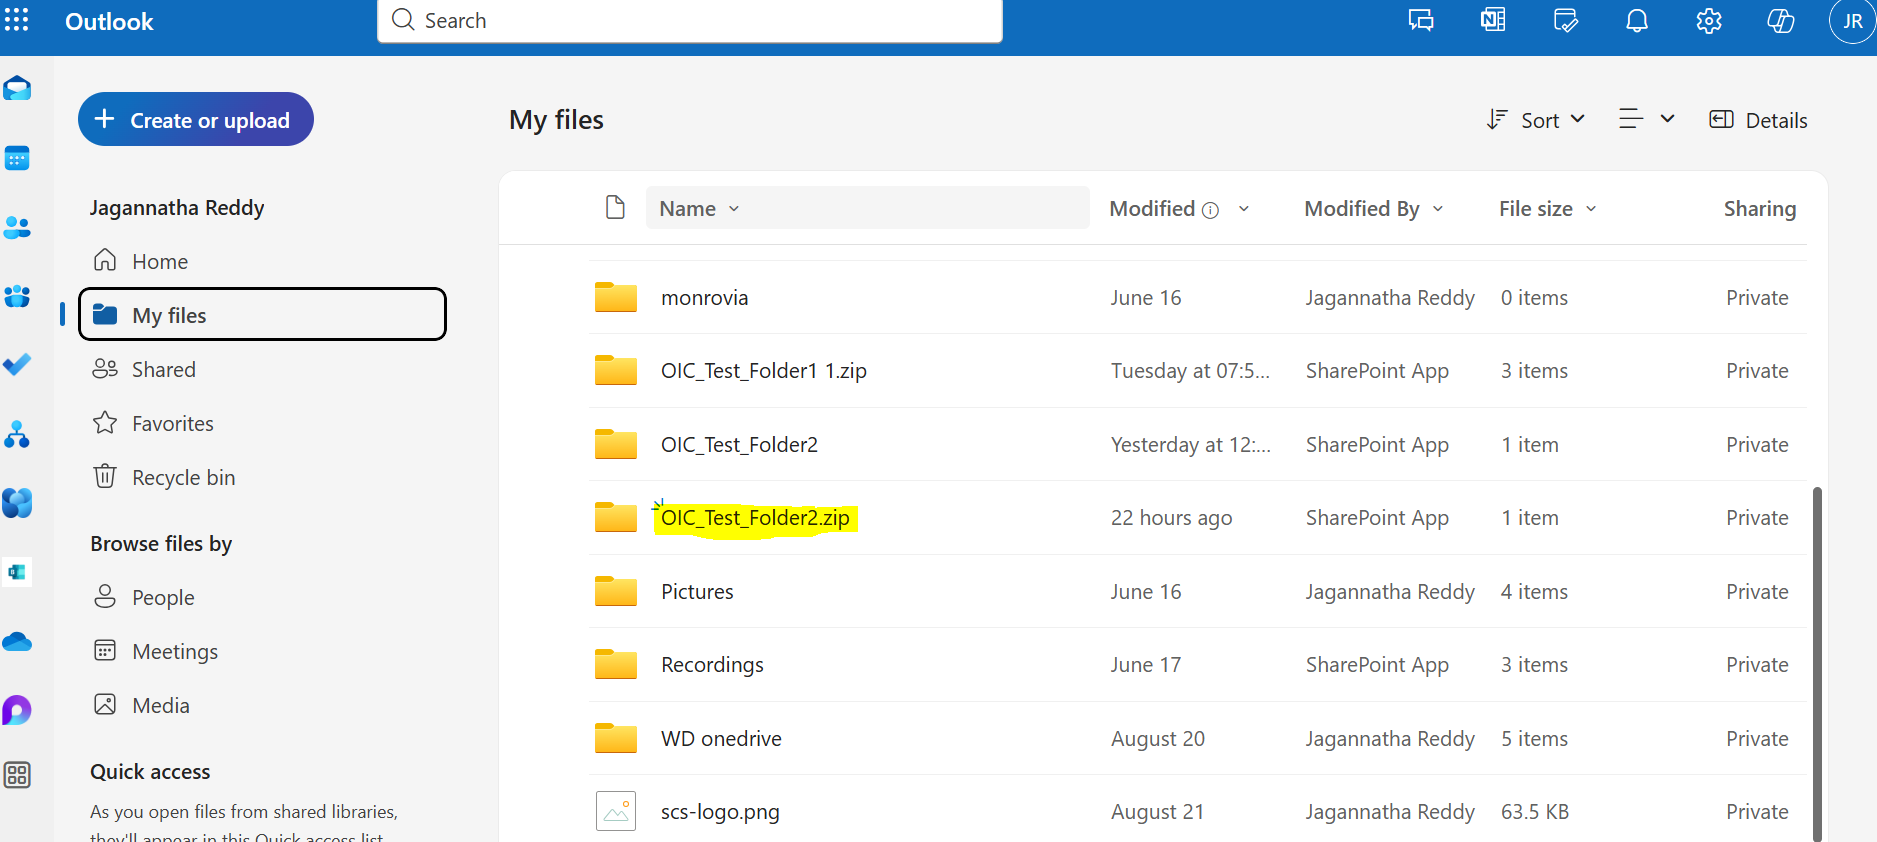
The folder and report data created in OneDrive by the integration.
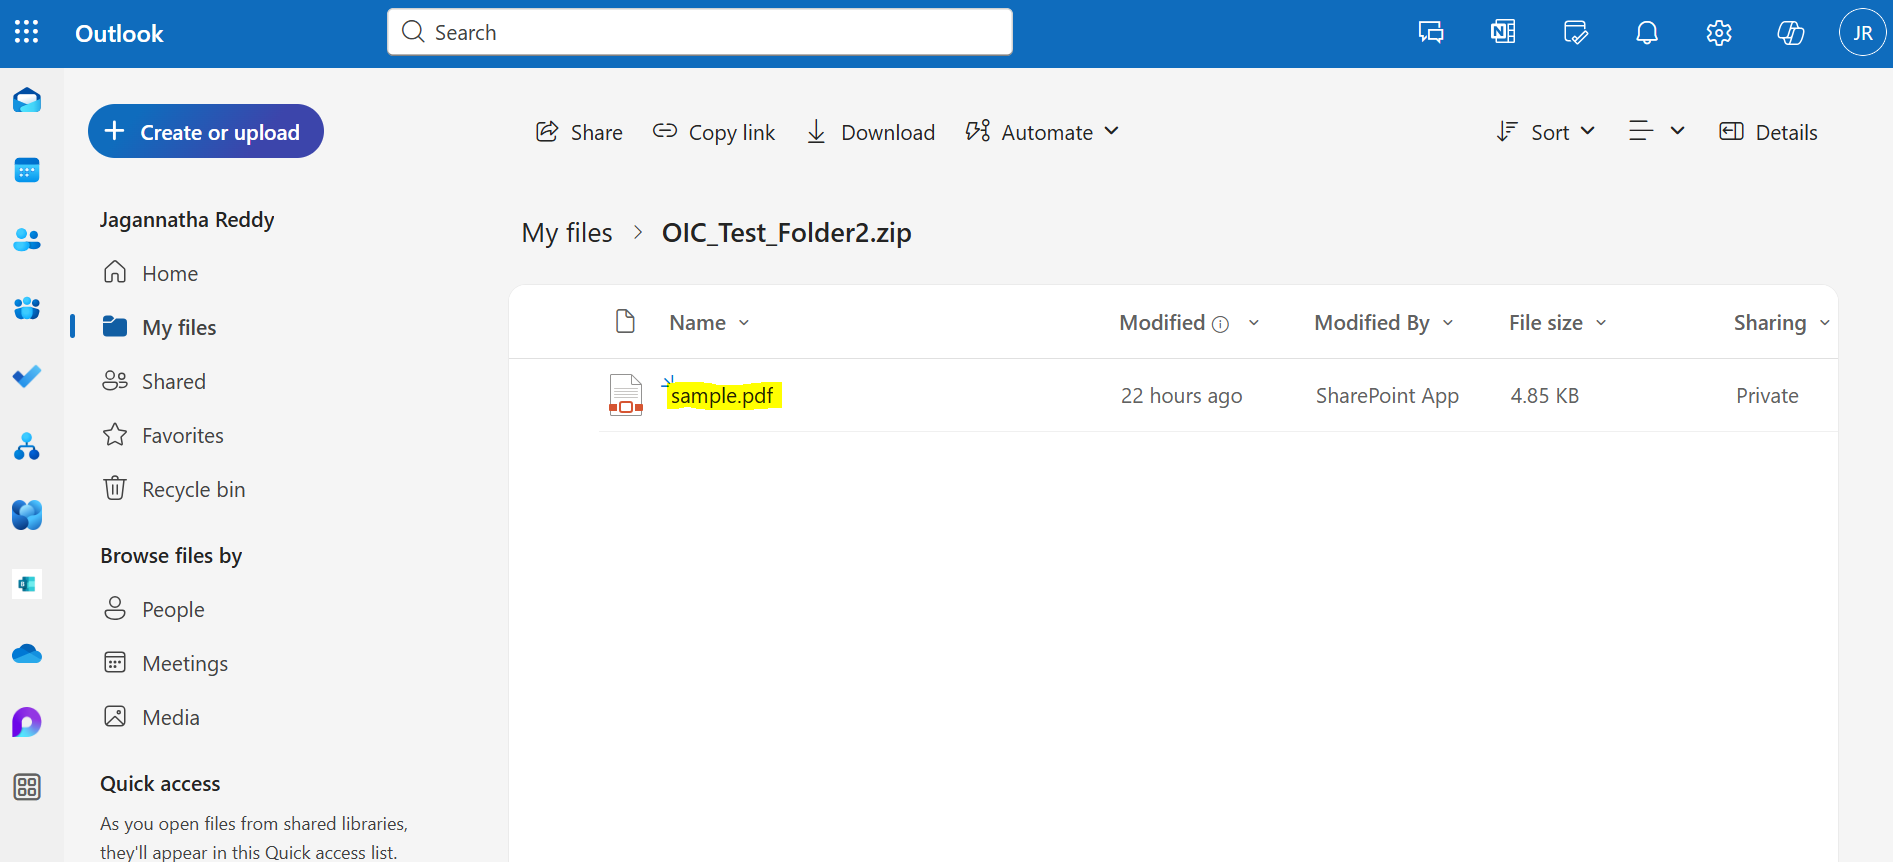
The file name given in the integration, now present in OneDrive.
6) Conclusion
In this guide, we walked through the complete process of integrating Microsoft OneDrive with Oracle Integration Cloud (OIC). Starting with App Registration in Azure, we generated the required credentials (Client ID, Secret, Tenant ID) and assigned Microsoft Graph API permissions. We then validated the connection using Postman to successfully create a folder.
Building on that foundation, we established a REST connection in OIC with OAuth 2.0 and designed a simple scheduled integration to automatically create folders in OneDrive. This integration runs without user input, making it ideal for automation scenarios such as daily folder creation for invoices, reports, or backups.
Finally, we automated the process of extracting a BI Publisher (BIP) report from Oracle Fusion using a SOAP connection, staging the data as a file in OIC, and transferring it to OneDrive using a REST connection:
- The SOAP adapter runs the report (runReport) and fetches the output in Base64 format
- The Stage File action converts this Base64 output into a readable file format like PDF
- The REST adapter is used in two steps: first to create a folder in OneDrive, and second to upload the file into that folder
By combining these steps, we build a seamless integration that moves data from Fusion to OneDrive automatically, without manual effort. The same pattern can be reused for different reports and file types by simply adjusting the parameters and mappings.
Back to All Blogs